-
Compteur de contenus
101 -
Inscription
-
Jours gagnés
3
Type de contenu
Profils
Forums
Calendrier
Articles
Tout ce qui a été posté par Charles
-
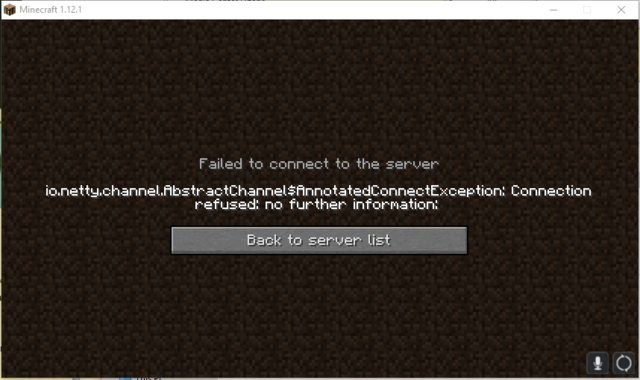
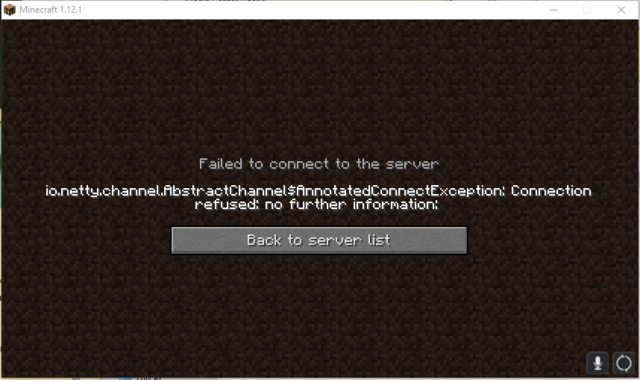
What are the causes of the connection error denied ? After receiving many reports from multiple users, we investigated the problem and developed a set of solutions to solve the problem for most users. We also examined the reasons for the error and listed them below. IP Problem: In some cases, the problem comes from an incorrect IP address or port when trying to connect to a server. The IP address with the correct port is used to transfer your connection to the server and the connection is established after the server has trusted. Firewall: It is also possible that the Windows firewall you are using is blocking your connection to the server. The Java files and the game directory must be added to the Windows Firewall exclusion list so that the game connects to the server correctly. Java obsolete: Minecraft requires Java software to be updated to the latest version to work properly. If Java is out of date on your device and the launcher has been updated to the latest version, there may be conflicts with some elements of the game that may prevent a proper connection to the server. Incompatible Software: There is a list of non-Minecraft-compliant software that is causing problems if it is installed on the computer on which you are trying to connect to the server. Minecraft has an official list of non-gaming software that generates conflict. Bad version of the launcher: A bad version of the launcher is often the cause of a connection problem. The version must be the same as the server version.
-
When the CPU usage is about 100% or more In our experience, excessive use of the processor is the main cause of the offset. To maintain the best performance, try to keep your CPU usage below 100%. There are many different reasons for increased CPU usage. Mods, plugins and global entities are the most common culprits. If you're wondering if you can access more processor resources, the answer is "no". Since the Minecraft server is dependent on the performance of a core, we use the latest Intel i7 processors at more than 4.2 / 5.0 GHz and do not impose any strict limits on your usage. We also monitor our machines 24 hours a day to make sure you can always use at least one heart. As we are already giving you the best, the best way to identify the cause of CPU usage problems is to troubleshoot the game. A server that uses too much CPU probably has one of the problems below. Exploration consumes CPU When you start a server for the first time, you may notice that some lag occurs immediately as players explore. The world is divided into regions, which are divided into pieces, which contain a 16x16 block area. Whenever you see a new song, it is generated by Minecraft. Song generation takes CPU. It is very common that this causes a shift on your server every time someone explores the world. There is no alternative but to wait for the delay to disappear once generation is complete. If you play Minecraft with the Forge modulator, there is a mod that can help mitigate the block generation problem by silently and automatically generating blocks before you crawl, without using as much CPU time. His name is Chunk Pregenerator. Try adding this to your server to see if it helps players who are exploring. Game version or modpack too old Using too old a version of the game or a modpack contributes to the various dysfunctions that they can generate. Mods consume CPU If you are using a modded server, some mods may cause increased CPU usage and performance issues. Have you started to be late after you start using some elements on your server? For example, in Minecraft 1.6.4, Twilight Forest and some elements of Mekanism can be very CPU intensive. However, these experiences are general and may not be relevant to your situation. For versions 1.10 to 1.12, instead of Opis, you will want to read: How to use LagGoggles to diagnose the offset. Entities consume CPU Another common problem is the large number of global entities. One of your players may have exploded something, which resulted in tons of unplaced blocks. Another might have spawned hundreds or thousands of monsters. Each of these elements or mobs will use a lot of processor and memory resources and, if they are numerous, will have a noticeable impact on performance. To remove features, make sure that you are using a server that can support CraftBukkit plug-ins, such as CraftBukkit, Spigot, or Cauldron. Then, install Essentials or WorldEdit and run one of the appropriate commands: WorldEdit: / clear items -1 Essentials: / remove all Sometimes your server may crash while trying to load because of the number of element entities everywhere. This could be due to the fact that a dishonest collector was not picking up items from a gang farm in another similar situation. There is a way to fight against this: Stop your server if it is not already. Open your server.properties file. Replace max-tick-time = 60000 with max-tick-time = -1. Back up your server. Use the following command in your console to kill all items: /kill @e [item] Too much Chunk consume CPU On Minecraft Vanilla, there is only one block that is loaded when you are not next, it's the spawn block. However, in Minecraft, many mods offer the possibility of keeping a charged piece even when people are not nearby. Some mod functions need it, so it has its uses. However, some players make it a habit to load all their songs so that objects can be created while they are offline. This ensures that many songs continue to work even when no one is on the server. Servers must always limit block loading as a rule. We also recommend disabling "easy" block loaders like the one found in FTB Utilities. Just check the mod settings and look for chunk references. The distance of view is too great If you have a popular server with players scattered on your map, reducing the viewing distance can improve performance. From the Minecraft wiki, the view distance from the server is based on: Sets the amount of global data that the server sends to the client, measured in chunks in each direction of the player. It determines the server-side viewing distance. The viewing distance "Far" is 9 pieces, which sends 441 songs in total (the number of songs the server will load will be visible in the debug screen). 10 is the default / recommended value. Tip: If you have a large offset, reduce this value. Reducing it can reduce CPU usage when you have multiple players. This can also help players who have a slower internet connection. Log in to your panel In your list of servers, find the server you want to modify, and click the Manage button on the right. On the server that you selected, click the Configuration tab. Locate and open the server.properties file. Find the line with the distance of view. Reduce it from 10 to 4 or 5. Save the file and restart your server. When the CPU utilization is less than 100% Network issues Transient network connection problems or if you are physically away from your server can make your Minecraft server less responsive. Before continuing with the instructions below, we recommend that you try to use a wired connection and make sure that users on your network do not download large files or consume a lot of bandwidth. You and your players can test the quality of your computer's connection to your server by testing in-game and running ping and trace routes. Stake: Connect to your server with your Minecraft client. Log in to your panel In your list of servers, find the server you want to modify, and click the Manage button on the right. On the console, type "say test" and press Enter. Check if the test appears right away in the game window. A delay indicates the latency of the network. To provide additional diagnostic information, run the ping and traceroute commands. Reduce view distance Sometimes reducing the distance from the server can help players with slower connections: Log in to your panel In your list of servers, find the server you want to modify, and click the Manage button on the right. On the server that you selected, click the Configuration tab. Locate and open the server.properties file. Find the line with the distance of view. Reduce it from 10 to 4 or 5. Save the file and restart your server. FPS client side Your server may seem late, but in reality it is your client. To check your frames per second (FPS), press F3 in Minecraft. It will display your current FPS. Anything above 20-30 FPS should provide adequate gameplay. If it is less than 20-30 frames per second, try adjusting your video settings in-game. Try using the following settings: Graphics: fast Rendering distance: short or normal Smooth lighting: off Performance: Max FPS Advanced OpenGL: ON You can also try using mods like OptiFine and FpsPlus to increase your framerate and improve client-side rendering performance. However, mods like these rewrite the Minecraft rendering engine and the default game logic on which the game and other mods depend. You may encounter strange errors, visual problems or crashes. Most players exchange their stability against an increase in their performance.
-
Your server does not use all its available RAM or all its CPU ? This is normal, like all computers, your server uses only what it needs. This is the game that manages the use of server resources.
-
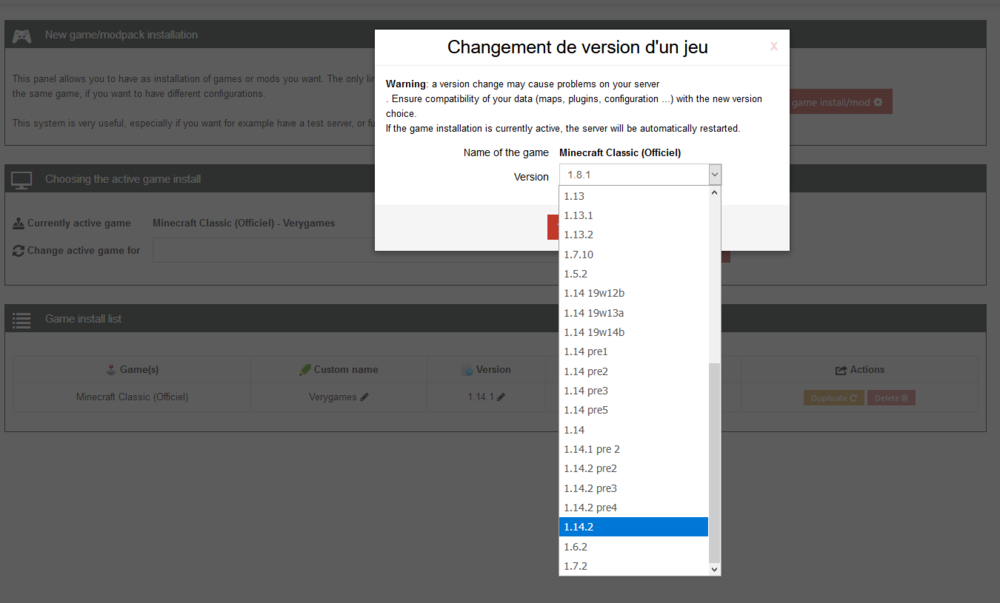
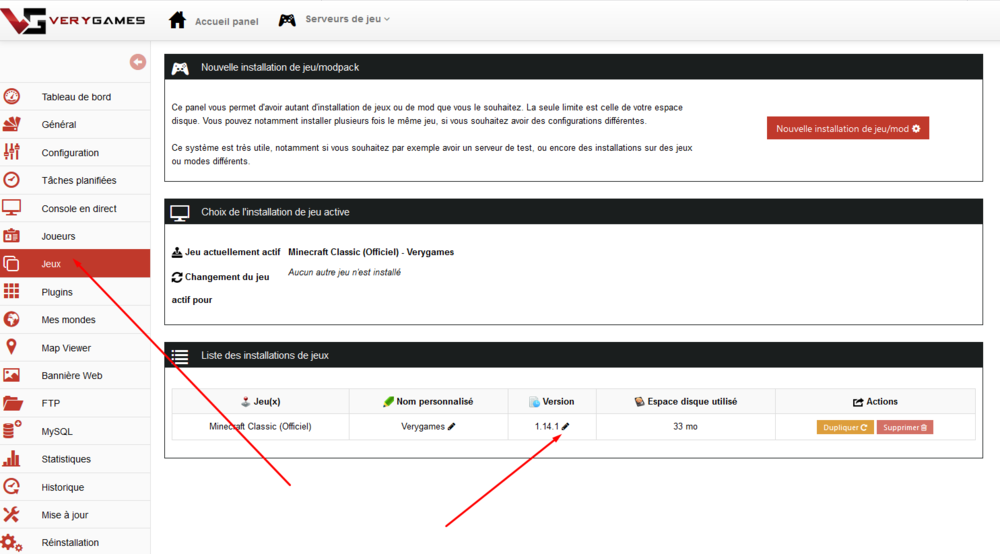
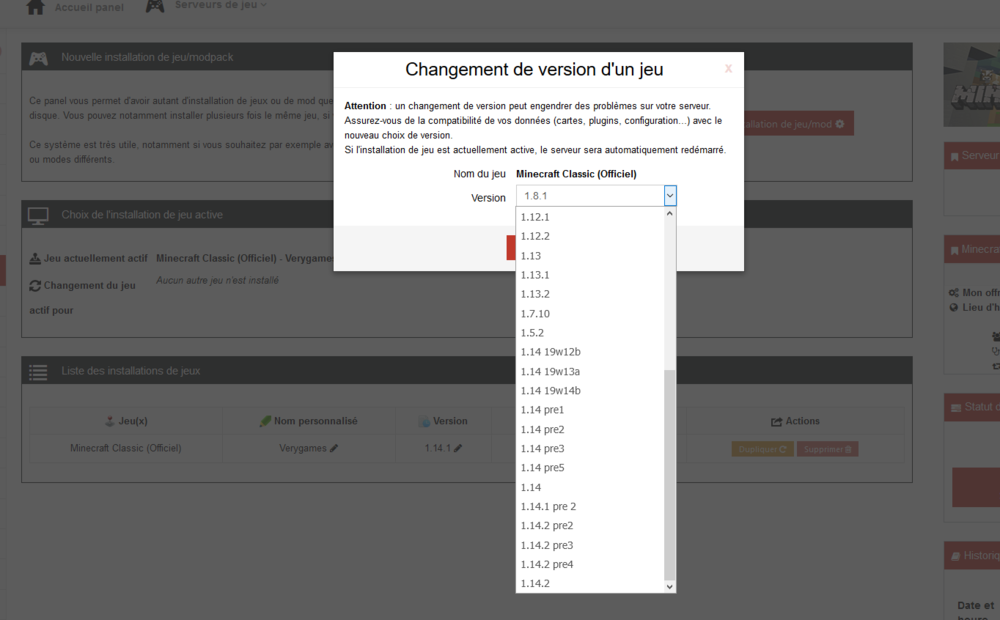
When a new version of Minecraft Classic is released and available on your VeryGames server, you can update your server easily without reinstalling it. Go to the "Games" tab of your VeryGames panel and click on the pen in the "Version" column.
-
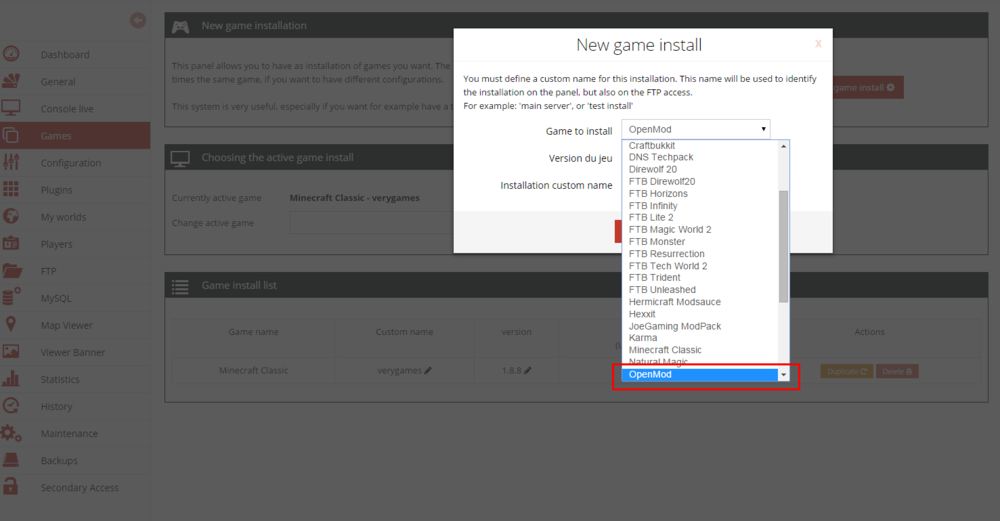
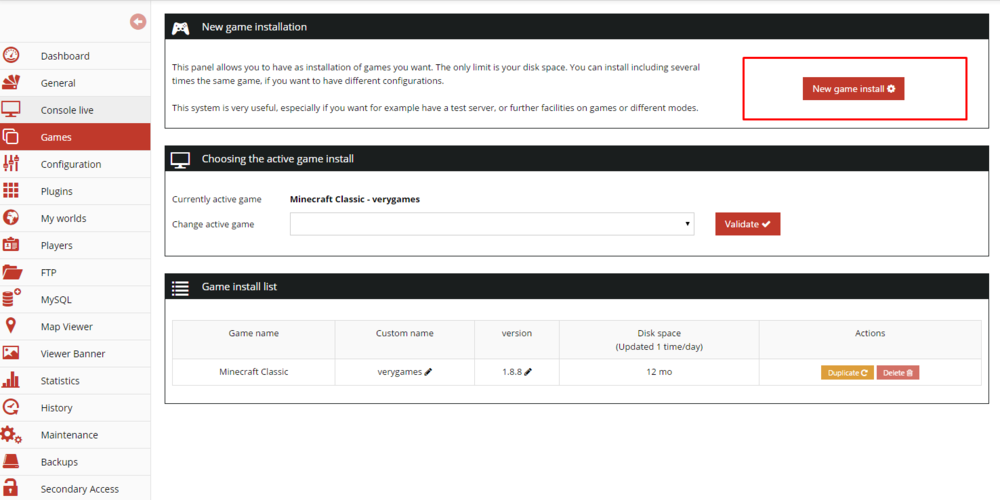
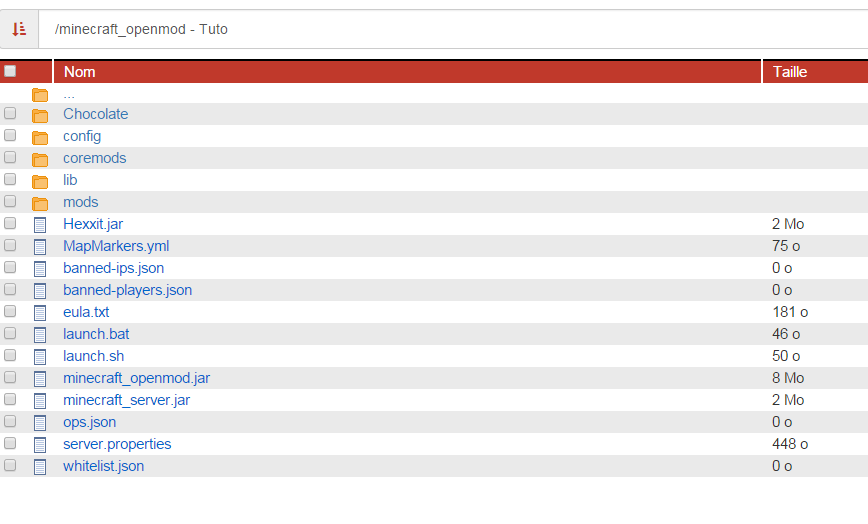
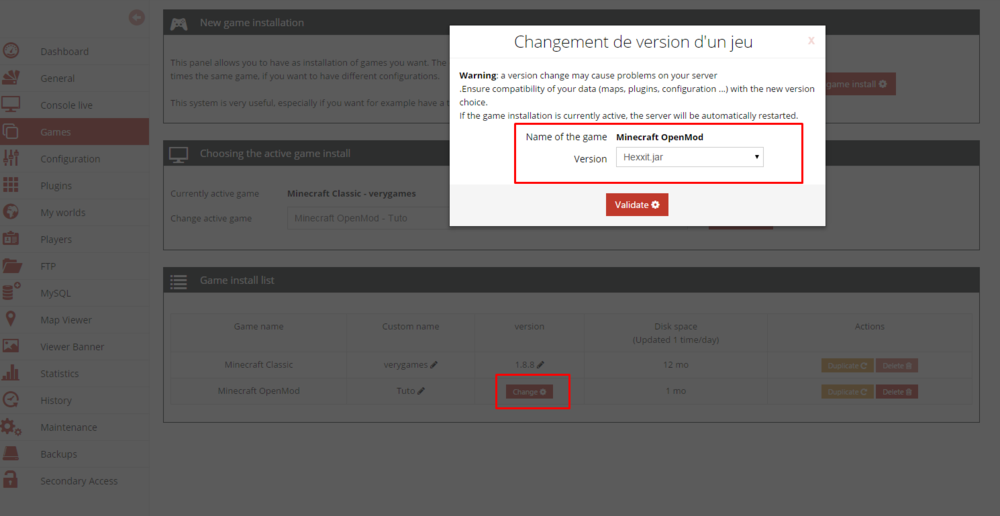
To install a Minecraft mod or version (Either because we don't provide it, or to install another version), you will need Openmod JAVA which allows you to choose the Minecraft archive to launch on your server. OpenMod JAVA is installable via the "Games" menu in your VeryGames admin panel. Launch the OpenMod install from the "new install" button. Go to you FTP and place the .jar archive you wish to launch in your OpenMod folder. Once you placed the .jar on your FTP, go back to your panel, in the "Games" menu. You will find an "installations list" at the bottom of this page. On the line : "Minecraft OpenMod" you have to select the archive you placed in your FTP, in the "version" column. You can select this archive by clicking on the red "change" button. Once you have confirmed your selection, your server will automatically restart on you .jar archive.
-
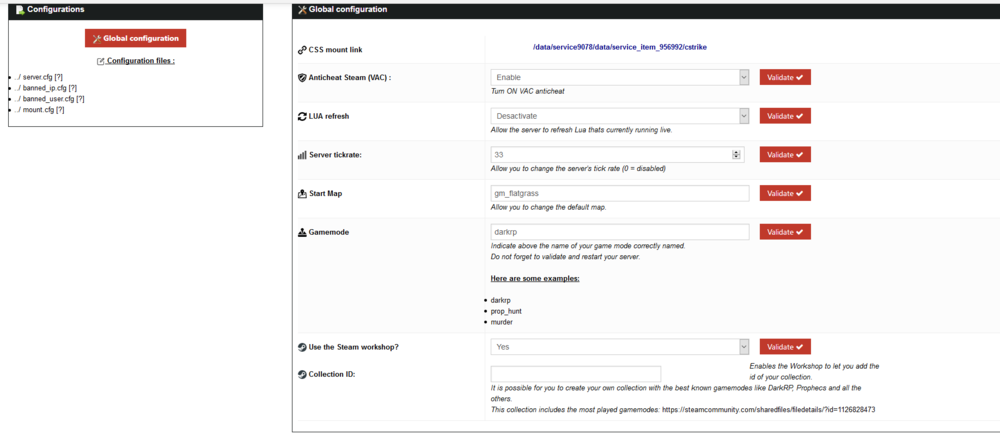
In your Configuration panel, enter the ID of the collection of your choice, containing the mod you want to use. CAUTION: If you use a map, you will need to define it in the specified box. CAUTION 2: The ID must be a COLLECTION and not a single object. The collection must also be PUBLISHED on the workshop. For example for Rockford: http://steamcommunity.com/workshop/f.../?id=328751281 So we use ID 328751281 To install DarkRP To install DarkRP, it will be enough to use the DarkRP collection available on the Worskshop Steam and to inform the Gamemode "darkrp"
-
To manage admins on your server, open the users.txt file in your server's FTP, in the Settings folder : You should get this : [indent] "Users" { // // This is your users file // // You can use this file to add people as admins on your server // Add them to the relevant section // // If you're a Lua coder you can add your own sections and use them // in your script by doing pl:IsUserGroup( "admin" ) etc // "superadmin" { //"garry" "STEAM_0:1:7099" } "admin" { //"garry" "STEAM_0:1:7099" } }[/indent] --------------- "Superadmin" : You will notice that it's the rank. You can use any ranks in this list : -Member. -Respected. -Admin. -Superadmin. -Owner "Garry" : is your nickname, you can choose any, it's the steamid that counts. Finally on the right, you have an exampl of SteamID. Put yours, save the file and restart the server. Don't forget to delete the "//" before your nickname in order for the line to be taken into account. -------------- To get your SteamID, you will have to go to the website https://steamid.io/lookup. Enter your steam profile link (or nickname) and click on Lookup.
-
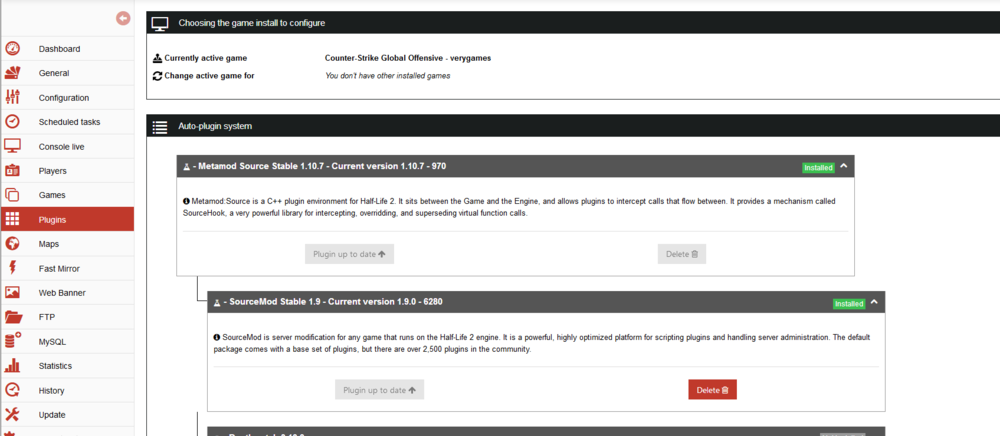
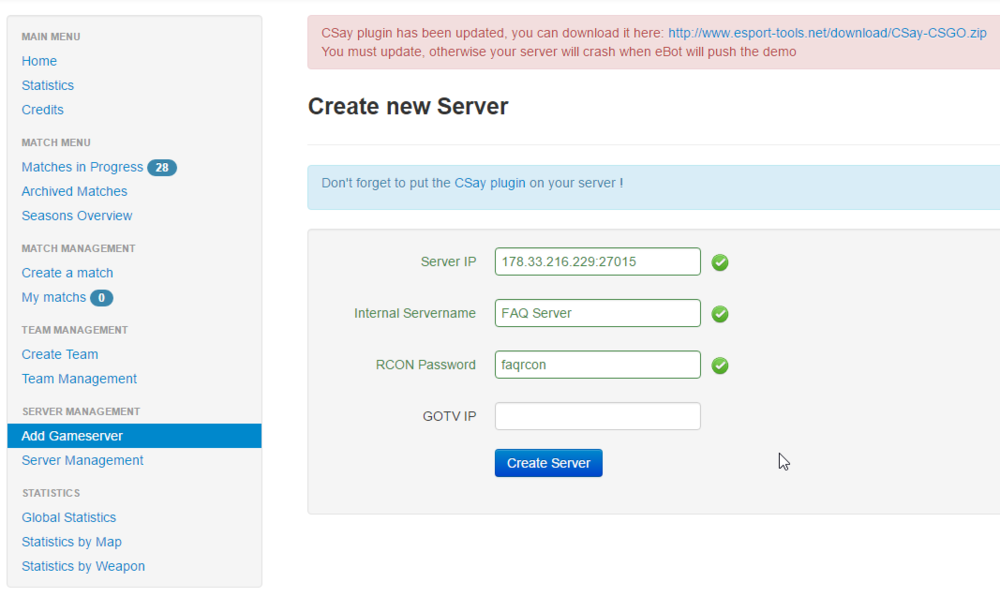
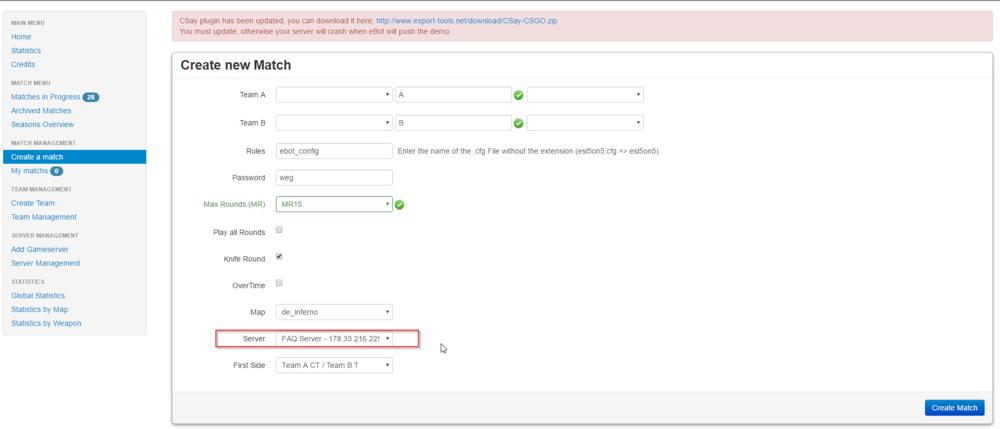
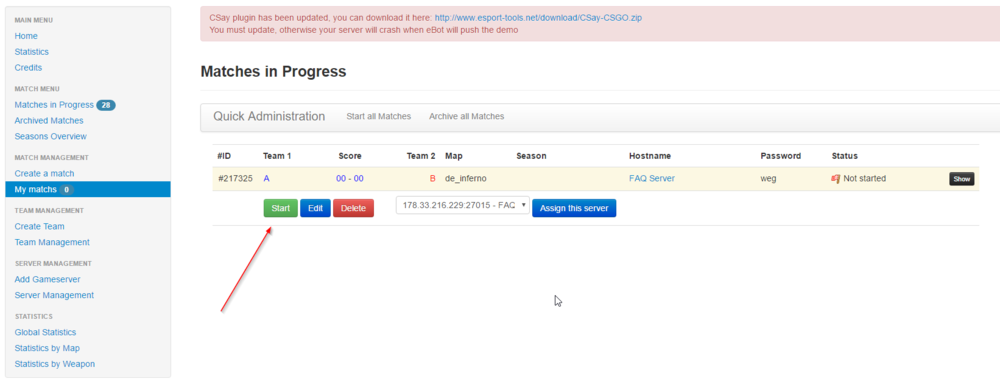
Install Sourcemod and Metamod from your panel. Install CSAY (ebot files) On the eBot website, create an account (or connect to your account), and add your game server : Care about the spaces in the IP address Create a match and select your server : You will then be able to start the match from the "my matchs" tab : Map and password changing will be done automatically. After that, both teams must type "!ready" on the chat in game to start the match.
-
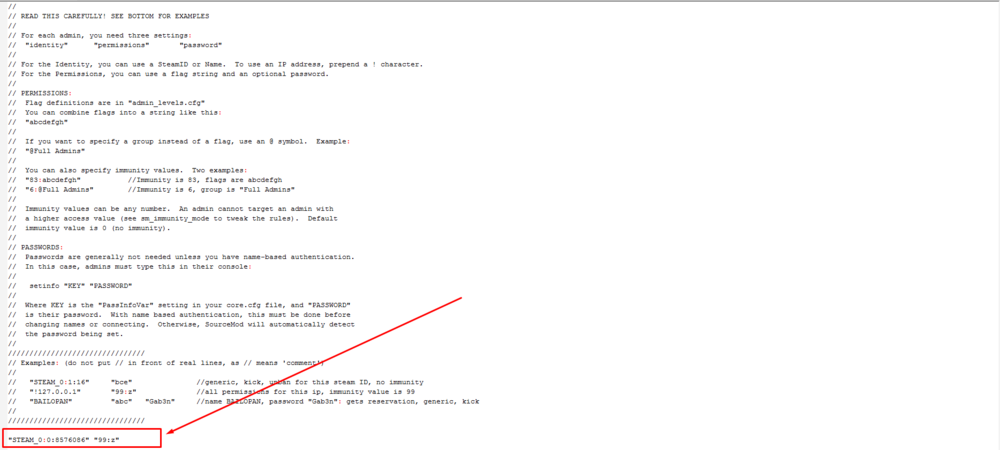
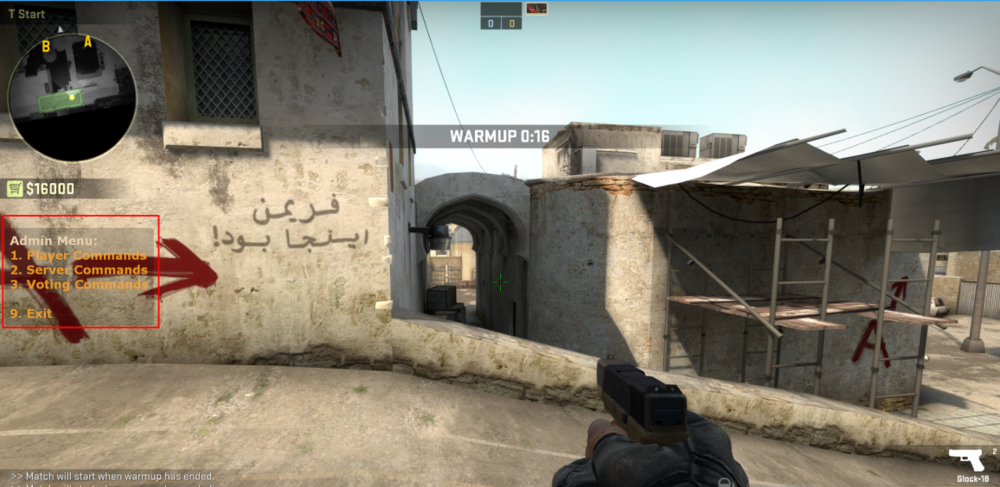
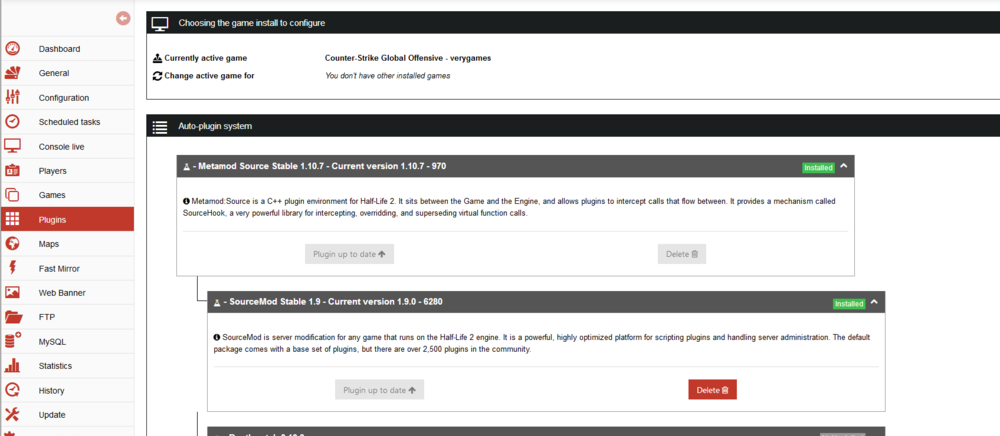
To become an admin on your server, you have to use Sourcemod. Sourcemod is a plugin to manage your server with a simplified panel. To install Sourcemod on your server, you have to go in the "Plugins" tab of your panel. In this tab, install Metamod first. Metamod is mandatory to be able to use Sourcemod. Then, install Sourcemod on your server. To add yourself you as an admin on Sourcemod, you need your STEAM_ID. To get your STEAM_ID, go to the website : https://steamid.io/lookup Add the link of your Steam profil in the search field and click on "Lookup". Then copy your STEAM_ID ( first line of the result : steamID ). When Sourcemod and Metamod are installed and your STEAM_ID copied, go to the "FTP" tab of your panel. Use the FTP access to connect to your FTP ( For a simplified usage, we advise you to use FileZilla ). Now that you are connected, go to the folder : /csgo - verygames/csgo/addons/sourcemod/configs. Open the "admins_simple.ini" file with a text editor. Add your STEAM_ID and the admin rights which you want like this : The right 99:z are the most frequently used. They give you all admin rights on your server. When you have set your rights up, save the admins_simple.ini file on your FTP and restart your server. Once your server is started, connect on it and launch the command !sm_admin in the text chat. The administration panel will appear, and you will be able to manage your server (ban/kick, change map etc...)
-
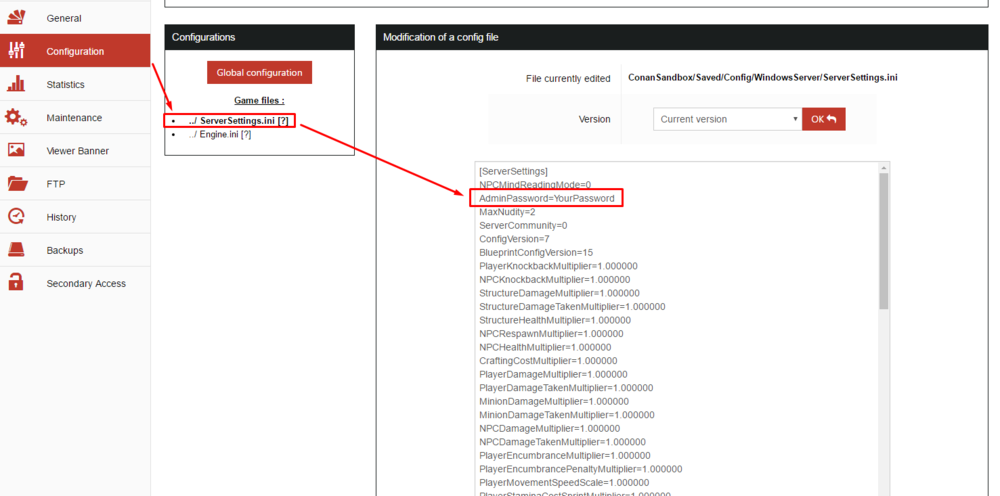
To setup an Admin Password, go to the ServerSetings.ini file, and add the line : AdminPassword=YourPass Save and restart your server. Use then the MakeMeAdmin command in your console in game, or directly log through the game menu. You'll then get the admin privileges.
-
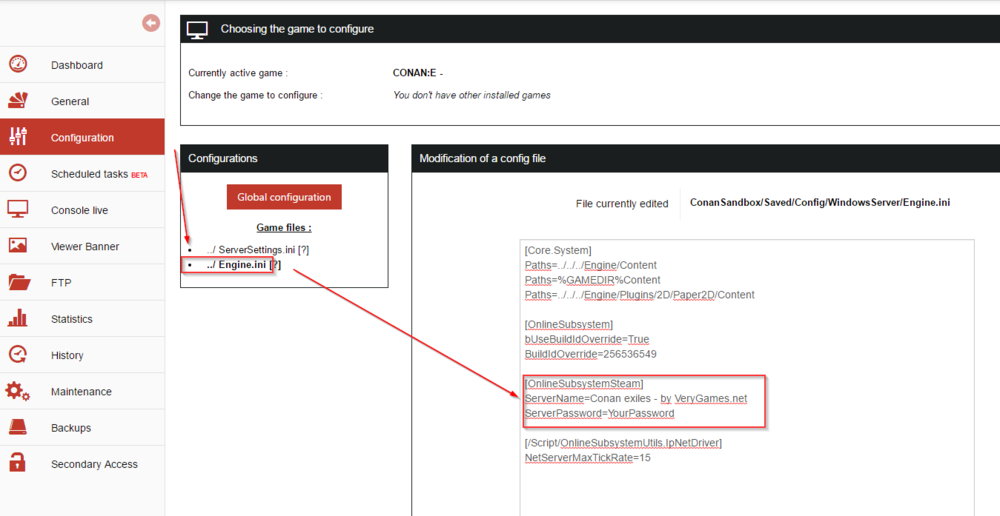
To change the name and the password of your server, your have to modify the engine.ini file. Choose the engine.ini file in the "configuration" tab and add the ServerPassword=YourPassword under the ServerName configuration. Your file should look like this : [OnlineSubsystemSteam] ServerName=Conan exiles - by VeryGames.net ServerPassword=YourPassword Save the changes and restart your server.
-
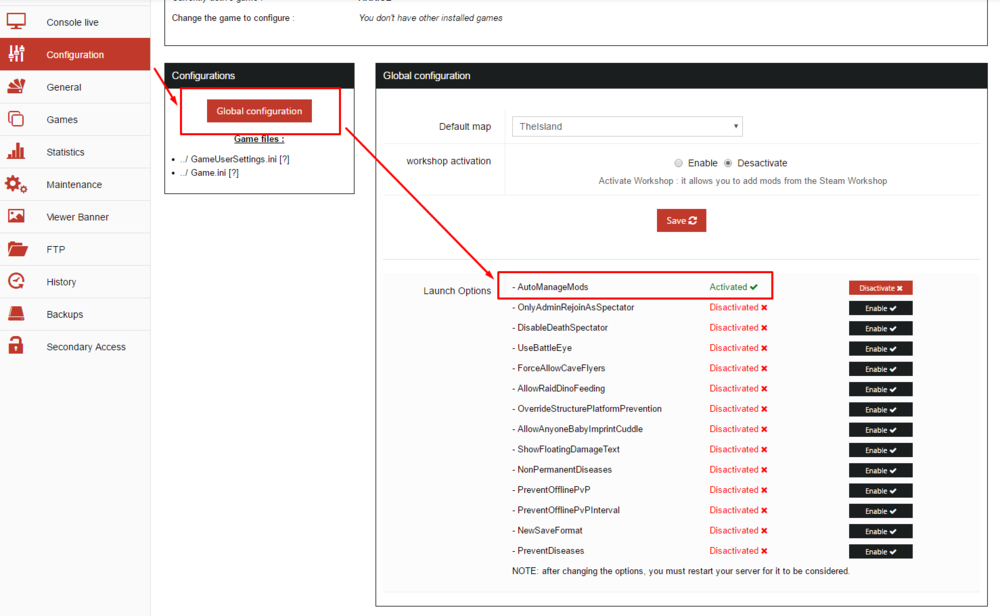
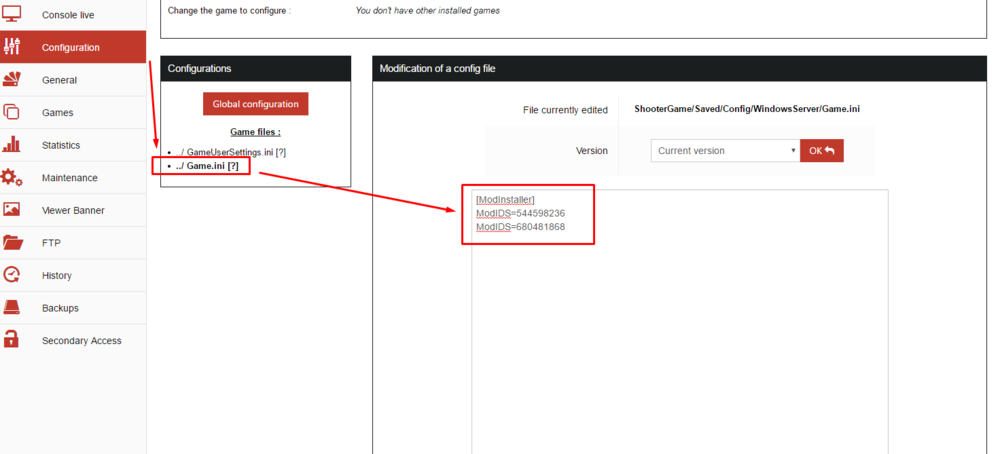
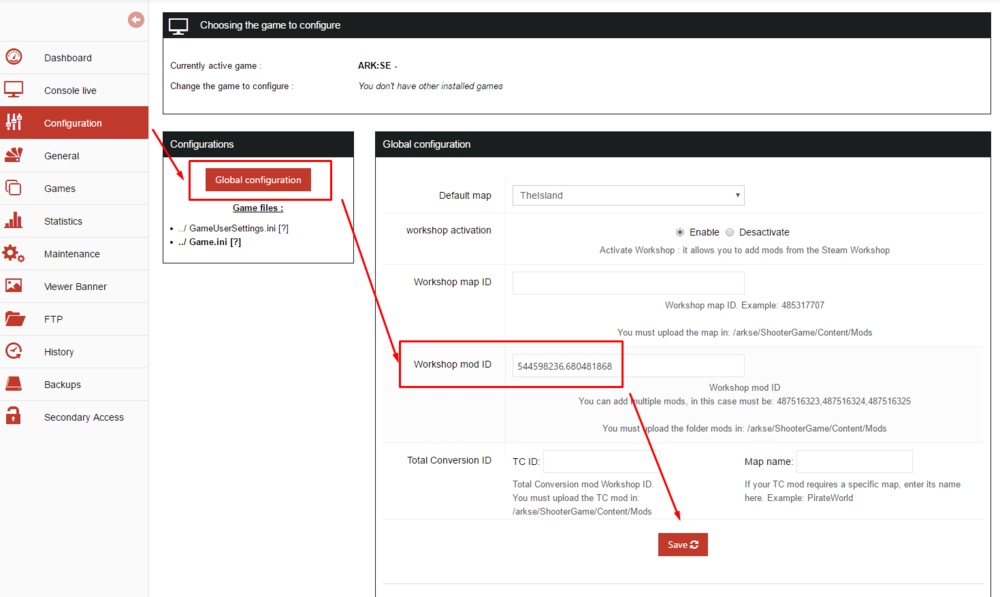
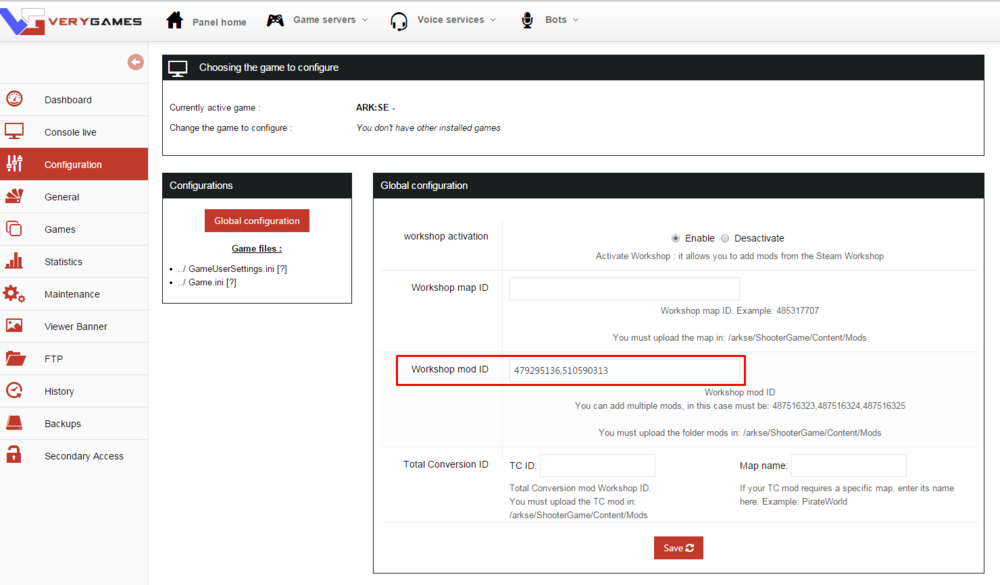
Since a game update, it's now possible to install and update your mods automatically on your Ark server. Indeed, you don't have to upload your mods one by one after each update anymore. To setup this, you have first to go to your "Configuration" tab, and activate "Automanagemods" : Then go to your game.ini file and add these lines (for example) : [ModInstaller] ModIDS=123456789 ModIDS=789456123 Add one line for each mod Add your mods IDs in the Configuration tab, in the Workshop Mod ID field of the "Global Configuration" tab. Add the ID in the Map ID field if you've installed a map such as Valhalla : Restart your server. The mods will be automatically installed. The more mods you install, the longer it will take for your server to restart.
-
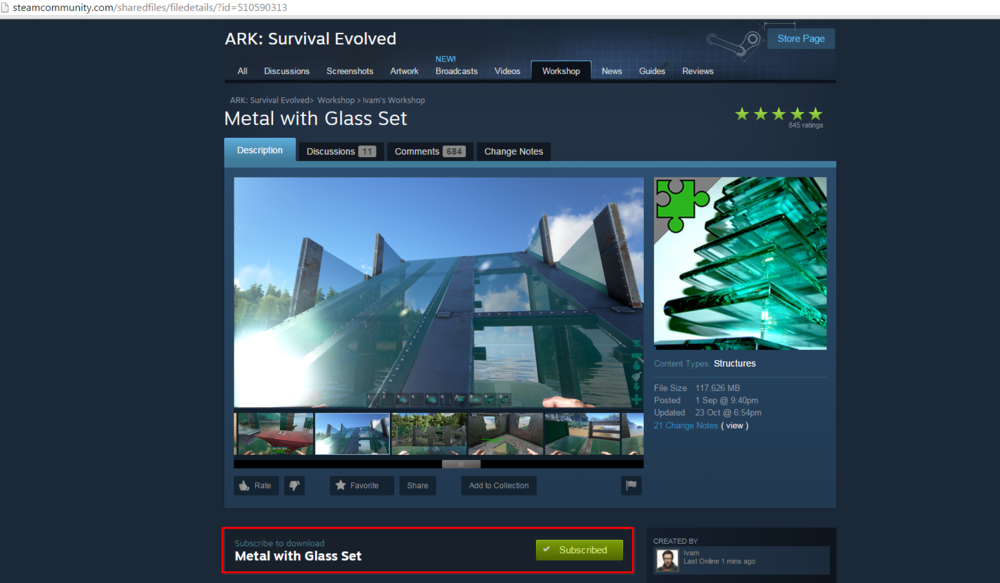
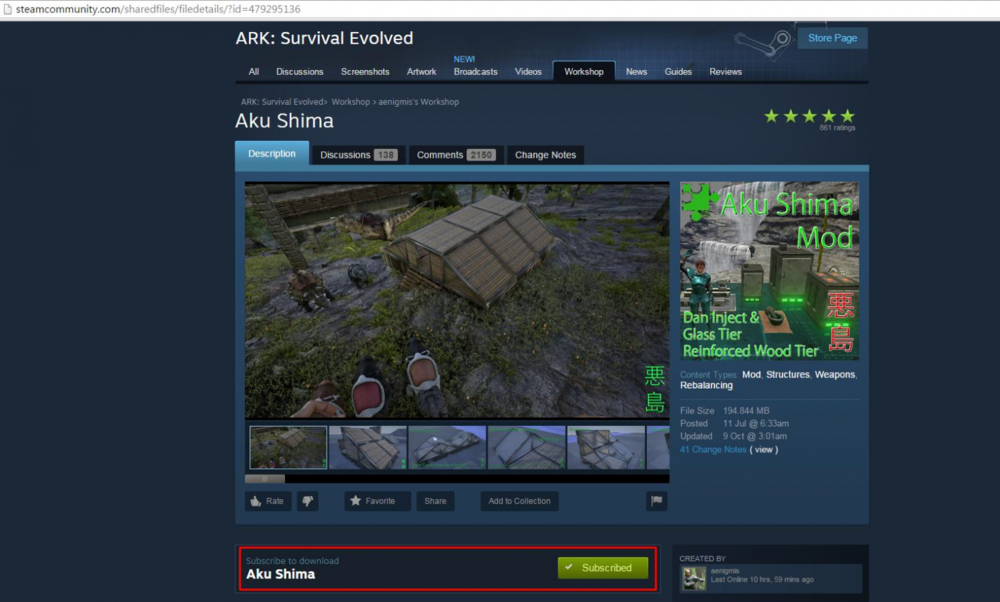
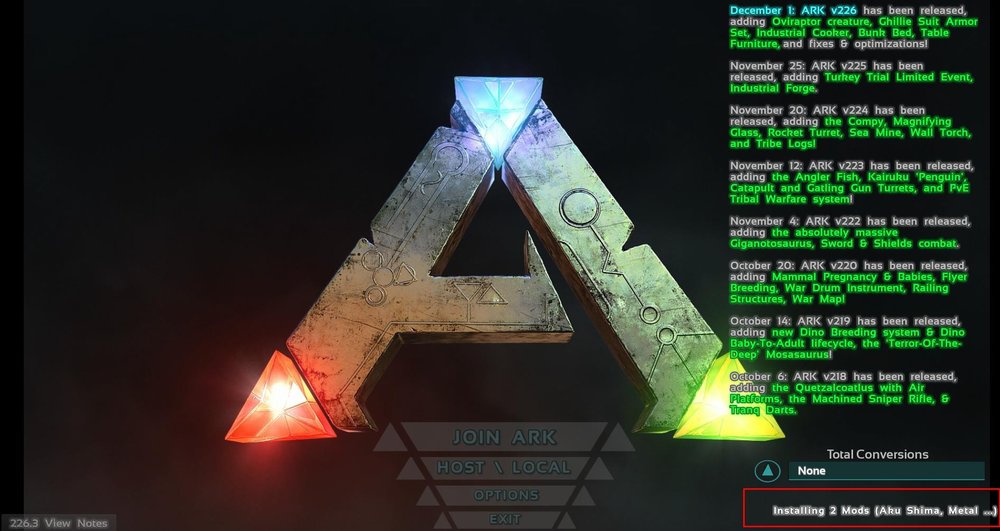
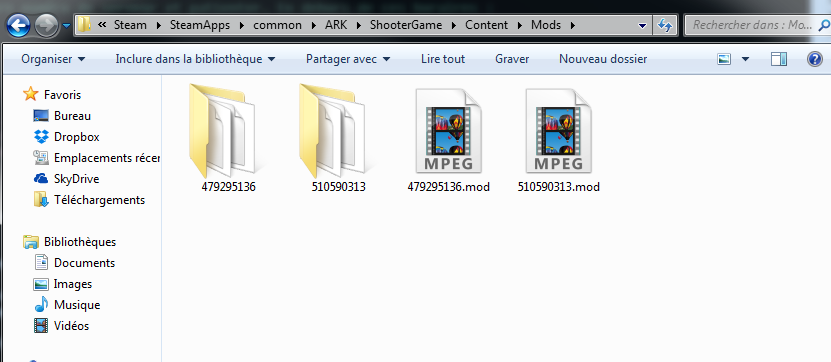
Go to your Mods folder on your computer and delete your mods. Then go to the Workshop and check you have subscribed to all the mods you want to install. Start your game. It will download the mods. Once downloaded, connect to your FTP and place your mods (mod folder + .mod file) in the Mods folder. Check your workshop configuration in your VeryGames panel are good (mods ID separated by a coma). Restart your server to apply the mods.
-
To change the Rcon password, you have to modify it in the "General" tab of your VeryGames panel. To use admin commands in game : Press on Tab And enter: "enablecheats <YourPassword>" After having activated this command, you can enter the following commands: setcheatplayer true: Enables a cheat menu setcheatplayer false: Disables the cheat menu cheat AllowPlayerToJoinNoCheck <SteamID>: Whitelists the person cheat DisallowPlayerToJoinNoCheck <SteamID>: Removes their whitelist cheat broadcast <MessageString>: Will allow you to broadcast a message to everyone on theserver cheat SetMessageOfTheDay <message>: sets a message that pops up when people enter cheat God: Enables god mode, you are unkillable except be careful, you can still drown. cheat Fly: You are able to fly. cheat Walk: Deactives flying and allows you to walk again. cheat Teleport: You are teleported in the way that you are facing. cheat slomo 5: Changes the speed on the server such as player movement, use slomo 1 to revert to normal speed. cheat playersonly: Freezes all dinosaurs at their current location and freezes crafting. cheat Ghost: noclip, ability to walk through walls/objects. cheat forcetame: instantly tames a dinosaur, can ride without saddle too. cheat addexperience 1000 0 0: gives you 1000 xp, you can change the value of 1000 cheat giveresources: gives you 50 of all resource cheat infinitestats: Gives you infinite hunger, stamina, infinite ammo etc. banplayer <SteamName>: Bans the user from the server unbanplayer <SteamName>: Unbans the user from the server cheat damagetarget <amount>: Deals damage to the creature you are aiming at. cheat destroyallenemies: Destroys all enemies, they respawn eventually giveengrams: Unlocks all crafting recipes for your character *Bugged, you can’t craft these recipes* cheat hurtme <amount>: Deals x amount of damage to yourself togglegun: toggles the visiblity of your currently equipped weapon/tool or the hands cheat settimeofday <timestring>: Changes the time of day, for example settimeofday 12:00 cheat setplayerpos 0 0 0: allows you to teleport to coords coord map. cheat saveworld: saves the current worldstate cheat quit: exits the current world, use after saving for a safe shutdown cheat execsetsleeping true/false: puts yor character to sleep/wakes them up cheat enemyinvisible true/false: makes all creatures ignore you even if you attack them cheat destroyall <classname>: destroys all objects/dinosaurs of a classname, refer to the dinosaur or item lists for specific classnames, also works with structures. cheat summon <classname>: Summons a dinosaur at your location. cheat giveitemnum <ID> <QTY> <Quality> <True/False>: Gives you an item. Example admincheat giveitemnum 1 1 1 false gives you a simple pistol and admincheat giveitemnum 1 1 100 false gives you an ascendant simple pistol Note: "True" gives you the plan to build it, "False" gives you directly the item.
-
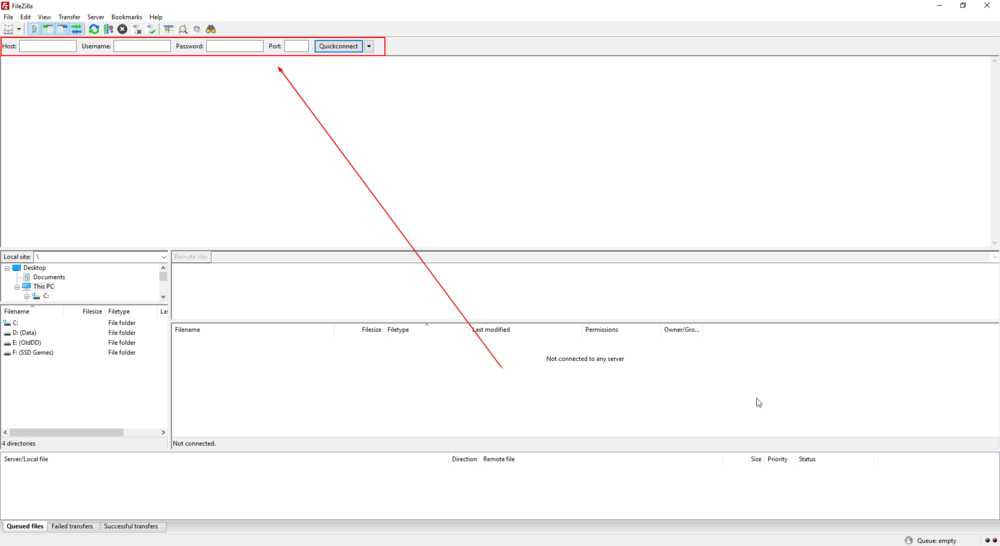
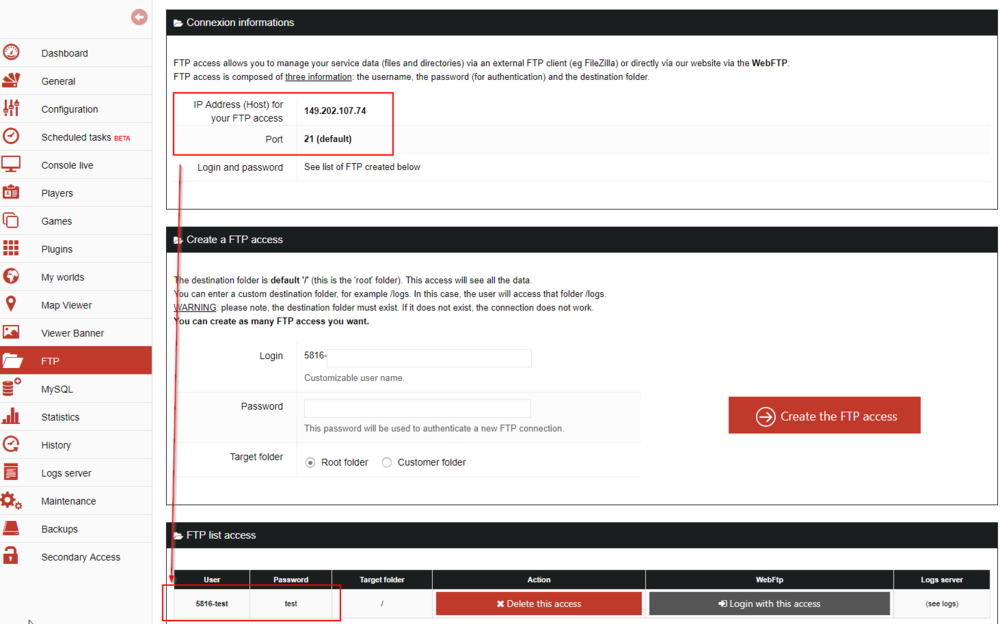
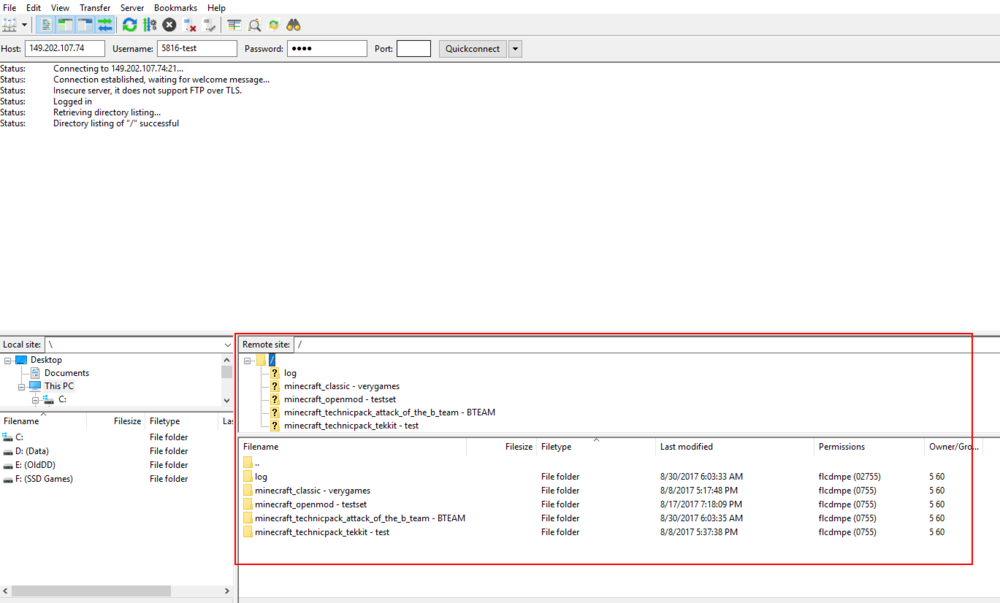
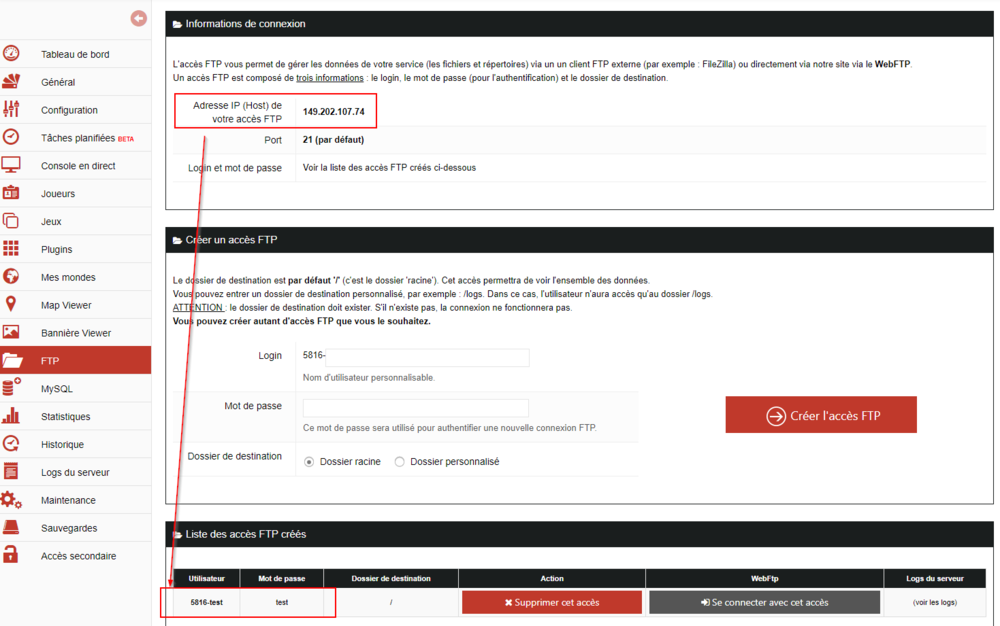
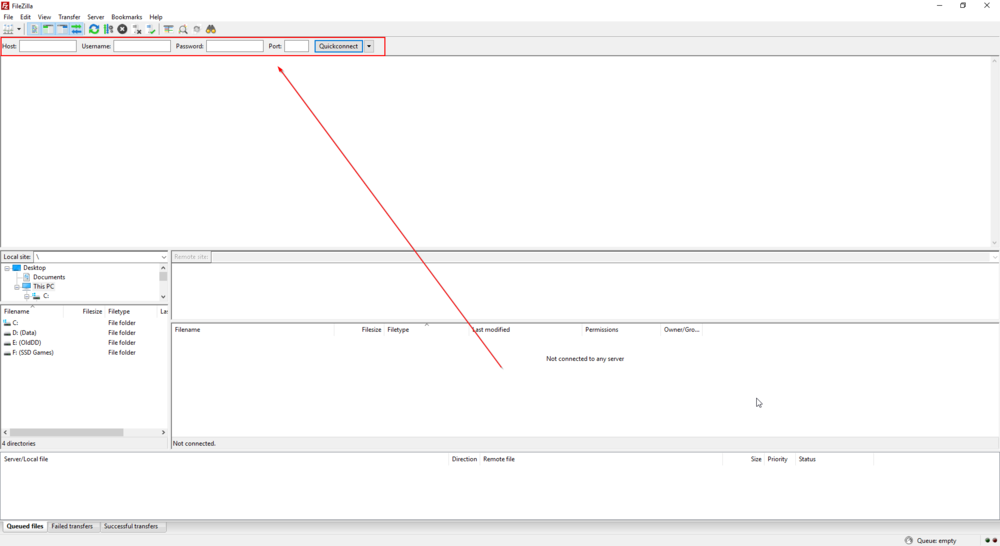
Filezilla will allow you to access your FTP and download folders from it. We also recommend its usage when you wish to send heavy or a high amount of files (mods, maps...). First, get Filezilla : https://filezilla-project.org/download.php?type=client In the FTP tab of your panel, you will find all the informations you need to connect to it. If you didn't create an access yet, simply create one in this tab. Use them on Filezilla : You will see all the folders of your installations (if you have several on Minecraft for example). You will be able to download and upload files and folders of your choice (backups, maps, configuration files...)
-
Rendez-vous dans l'onglet "jeux" de votre panel : Cliquez ensuite sur le petit stylo disponible à coter de la version de votre jeu/modpack. Un menu déroulant apparaît afin de pouvoir choisir la version dont vous avez besoin.
-
Rendez-vous dans : [Répertoire d’installation Steam] \ steamapps \ common \ Starbound. Le répertoire d'installation de Steam fait référence à l'emplacement d'installation de Steam. Cela pourrait être différent sur n'importe quel ordinateur. Cependant, il se trouve généralement sous C: \ Program Files \ Steam. À partir de ce répertoire, accédez à [Répertoire d’installation Steam] \ steamapps. À partir de là, accédez à workshop \ content \ 211820. Votre emplacement final devrait être [répertoire d’installation Steam] \ steamapps \ workshop \ content \ 211820. Télécharger des mods Starbound sur votre serveur Connectez-vous à votre serveur FTP. Naviguez dans le répertoire starbound. Cliquez avec le bouton droit sur le site distant et créez un répertoire nommé mods. Entrez le répertoire mods. Faites glisser tous vos mods client depuis le répertoire [Répertoire d'installation de Steam] \ steamapps \ workshop \ content \ 211820 vers le répertoire mods de votre serveur.
-
Votre serveur n'utilise pas toute sa RAM disponible ou tout son CPU ? C'est tout à fait normal, comme tous les ordinateurs, votre serveur utilise uniquement ce dont il a besoin. C'est le jeu qui gère l'utilisation des ressources serveur.
-
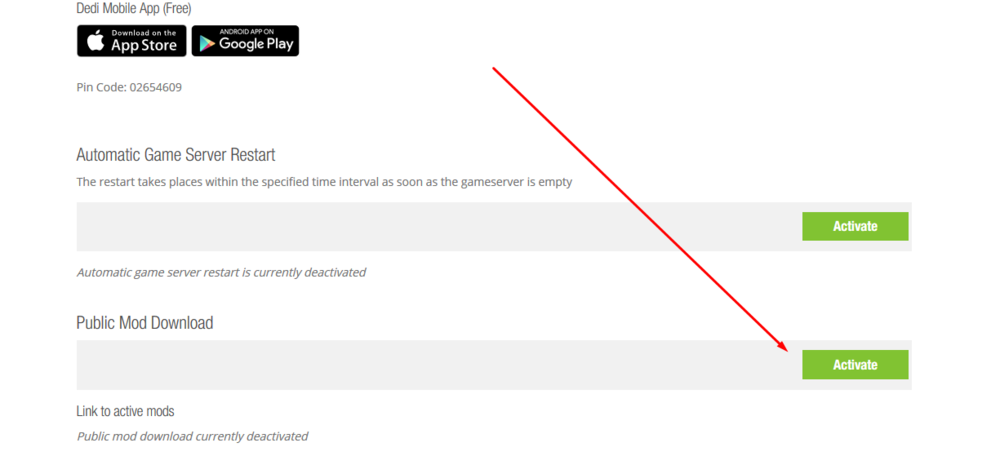
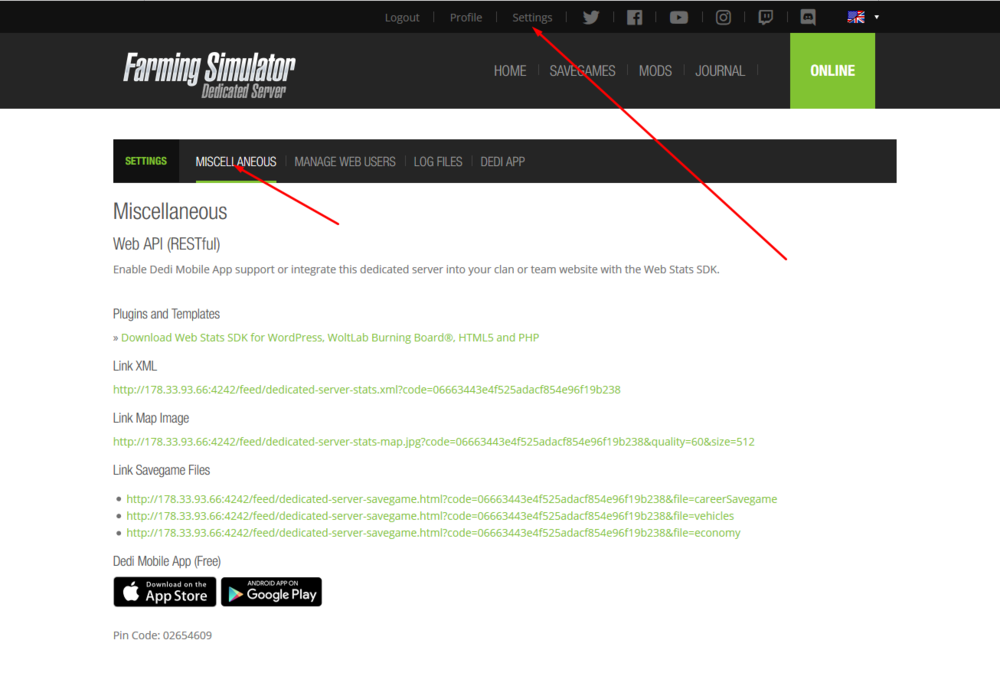
Pour créer un lien de téléchargement de votre liste des mods de votre serveur, il faut dans un premier temps vous rentre sur votre panel FS. Ensuite, dans l'onglet "Settings" disponible sur le haut de votre panel. En bas de cette page, cherchez Public Mod Download et cliquez sur le bouton "Activate" afin d'afficher votre lien.
-
Quelles sont les causes de l'erreur de connexion refusée? Après avoir reçu de nombreux rapports de plusieurs utilisateurs, nous avons étudié le problème et élaboré un ensemble de solutions permettant de résoudre le problème pour la plupart des utilisateurs. Nous avons également examiné les raisons pour lesquelles l'erreur est déclenchée et les avons énumérées ci-dessous. Problème IP : Dans certains cas, le problème provient d'une adresse IP ou port incorrecte lors de la tentative de connexion à un serveur. L'adresse IP avec le port correct est utilisée pour transférer votre connexion au serveur et la connexion est établie une fois que le serveur a approuvé. Pare-feu : il est également possible que le pare-feu Windows que vous utilisez bloque votre connexion au serveur. Les fichiers Java et le répertoire du jeu doivent être ajoutés à la liste des exclusions du Pare-feu Windows afin que le jeu se connecte correctement au serveur. Java obsolète : Minecraft exige que le logiciel Java soit mis à jour à la dernière version pour fonctionner correctement. Si Java est obsolète sur votre appareil et que le programme de lancement a été mis à jour à la dernière version, des conflits avec certains éléments du jeu pourraient se produire et empêcher une connexion correcte au serveur. Logiciels incompatibles : Il existe une liste de logiciels non compatibles avec Minecraft et posant des problèmes s'ils sont installés sur l'ordinateur sur lequel vous essayez de vous connecter au serveur. Minecraft dispose d'une liste officielle de logiciels non compatibles avec le jeu et générant des conflits. Mauvaise version du launcher : Une mauvaise version du launcher est souvent la cause d'un problème de connexion. La version doit être la même que celle du serveur.
-
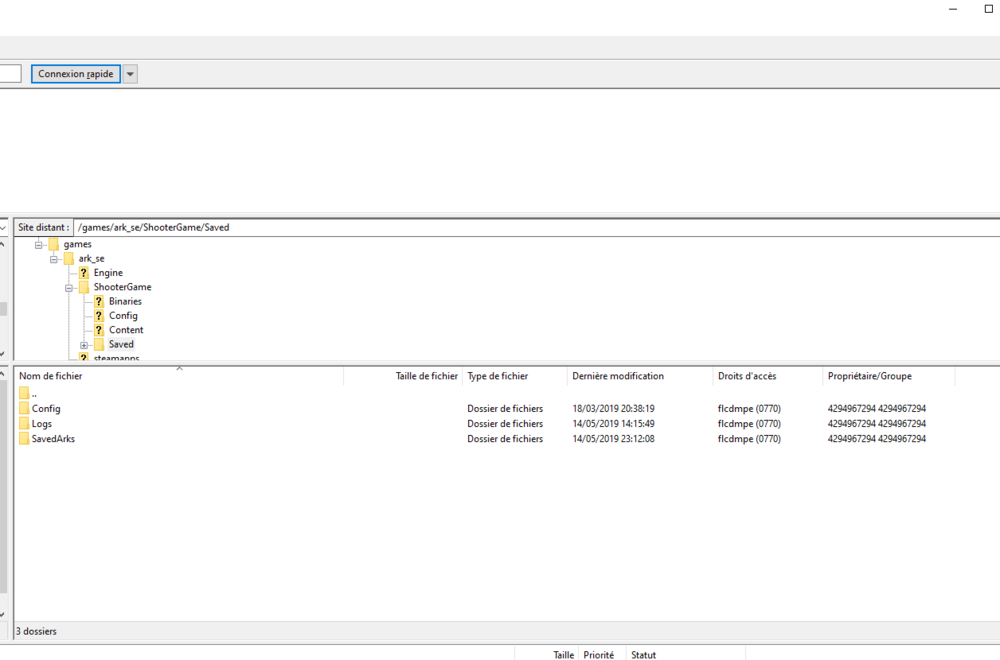
Filezilla vous permettra d'accéder à votre FTP et de télécharger des dossiers depuis celui-ci. Nous recommandons également son utilisation lors de l'envoi de nombreux fichiers ou de fichiers volumineux sur votre serveur (mods, maps...). Tout d'abord, munissez-vous du logiciel via ce lien : https://filezilla-project.org/download.php?type=client Dans l'onglet FTP du panel de votre jeu, vous trouverez les informations afin de vous connecter à votre FTP. Si vous n'en avez pas encore créé, créez de nouveau accès via cet onglet. Retranscrivez-les sur Filezilla : Vous verrez alors les différents dossiers d'installation. Rendez-vous dans le dossier /games/ark_se/ShooterGame/Saved Vous pouvez alors télécharger le dossier SavedArks qui contient votre carte et les personnages (vos joueurs).
-
Problèmes rencontrés : Q : Mon serveur crash, que faire ? R : Dans la plupart des cas, les mods sont responsables des crashs de l'application du jeu sur votre serveur. Si votre serveur démarre correctement sans les mods, il faudra trouver le ou les mods qui causent le problème de démarrage ou de crash en cours de partie. Q : Mon serveur ne démarre pas, que faire ? R : Nous vous livrons un service fonctionnel et disponible en ligne. Il est possible qu'à la suite d'une modification de votre part, le serveur ne démarre plus. Vous pouvez consulter les logs de votre console en ligne pour détecter une éventuelle erreur. Si le serveur ne démarre toujours pas, nous vous invitons alors à faire une réinstallation de votre serveur depuis votre panel. Q : Mon serveur subit des perturbations, que faire ? R : Si vous constatez des perturbations sur votre service (lag, ralentissements, téléportations, crash...), pensez à consulter les graphiques de consommation de ressources processeur (CPU) et mémoire (RAM) dans votre panel, dans le menu "Statistiques". Cela vous permettra de diagnostiquer une possible consommation anormale des ressources, lié à votre configuration (mods, plugins, carte, taille de votre carte, variables de configuration...), qui expliquerait ces perturbations. Dans ce cas, la seule solution est de trouver l'origine précise de cette utilisation de ressources. Plusieurs méthodes possibles: désactiver tous les plugins/mods puis les réactiver un à un, changer de carte (même temporairement), réinitialiser les variables de configuration, et en dernier recours réinitialiser le service. Q : Mon serveur CSGO est joignable uniquement en LAN ? R : Le Token ID dans l'onglet configuration n'est pas renseigné ou a expiré. Les logs de votre console en ligne vous donneront ces informations. N'oubliez pas de redémarrer votre serveur par la suite. Q : Mon serveur CSGO/CSS ne permet pas le téléchargement de maps, models, ... R : Les maps non officiels, les models de joueurs, ... demande un téléchargement via un miroir (FastDL). Vous devez donc souscrire à l'option "Miroir de téléchargement" et ajouter la configuration sv_downloadurl "URLDEVOTREMIROIR" dans votre server.cfg.
-
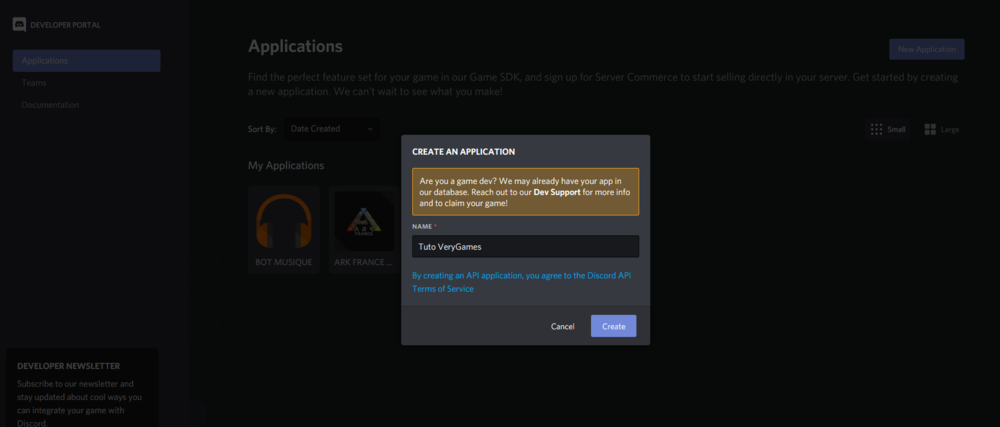
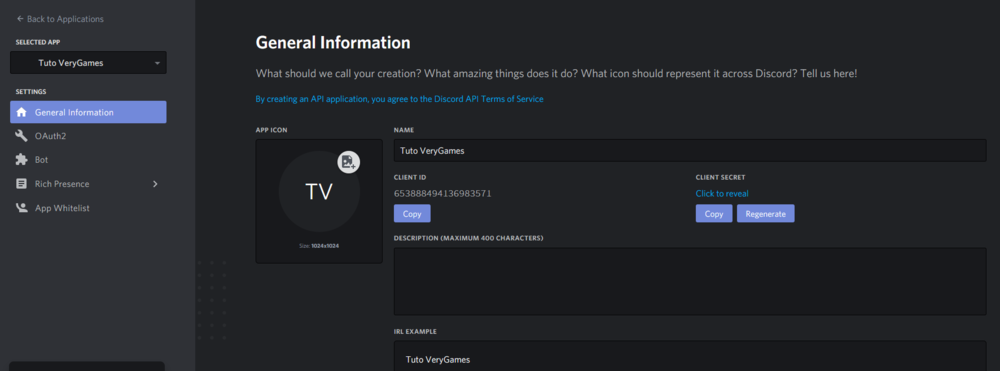
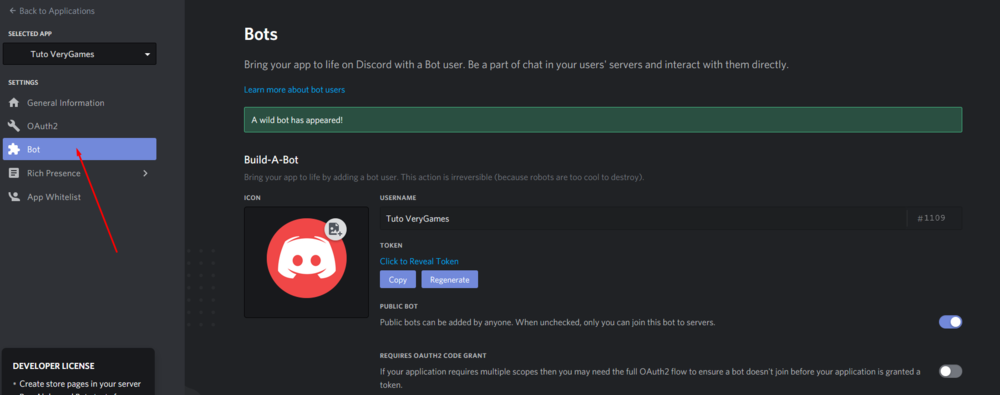
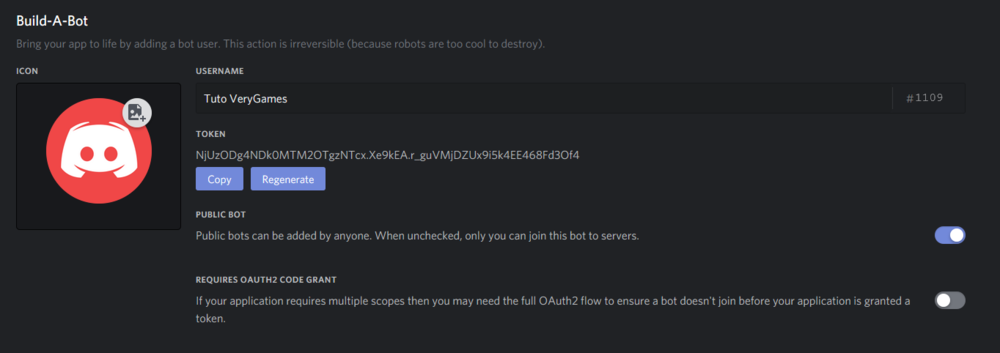
Pour connecter votre bot à votre serveur discord, créez tout d'abord un app via ce lien : https://discordapp.com/developers/applications/me Choisissez le nom de votre bot puis créez l'app : L'application est maintenant créée : Ajoutez maintenant un bot via l'onglet "bot" : Copiez le TOKEN : Placez-l'ID de l'app disponible dans l'onglet "général information" et le Token du bot sur votre panel : Invitez l'app sur votre serveur Discord en lui copiant ce lien sur votre navigateur (en prenant soin de remplacer le client ID dans le lien par le votre) : https://discordapp.com/oauth2/authorize?&client_id=YOUR_CLIENT_ID_HERE&scope=bot&permissions=0 Une fois cela fait, enregistrez les paramètres. Le bot se connectera alors à votre serveur Discord : Utilisez votre bot comme avec TS3, en vous connectant au panel depuis l'onglet "Panel MusicBot" de votre panel Verygames :
-
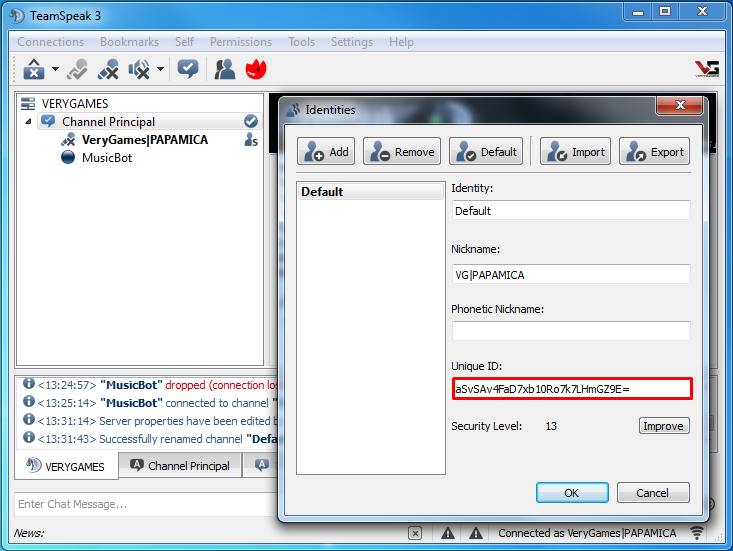
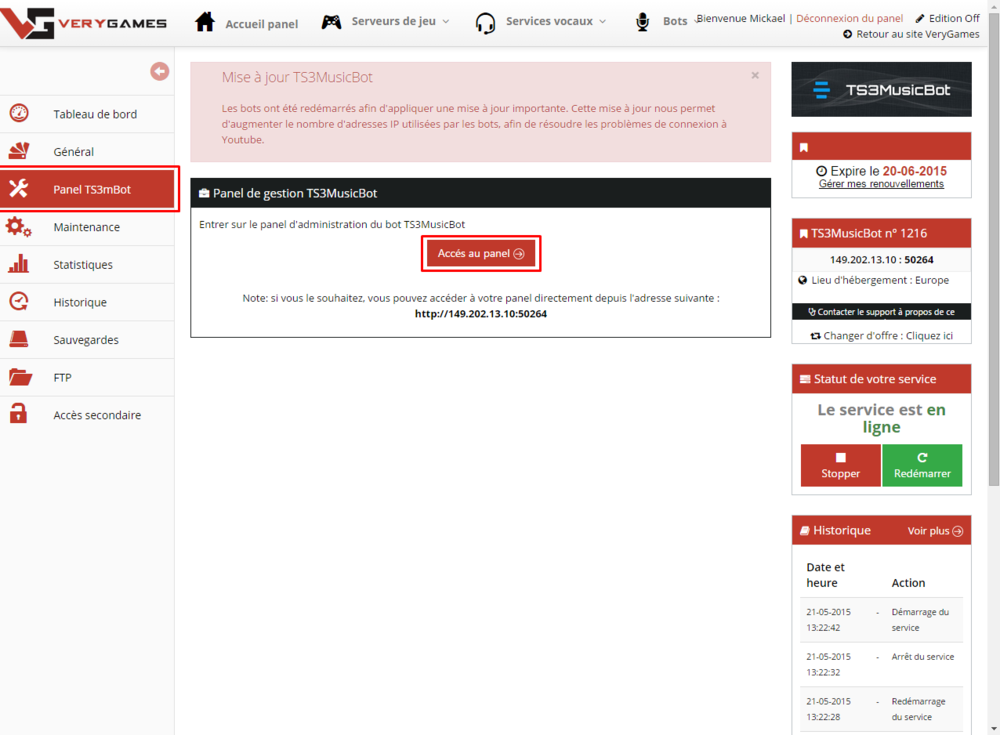
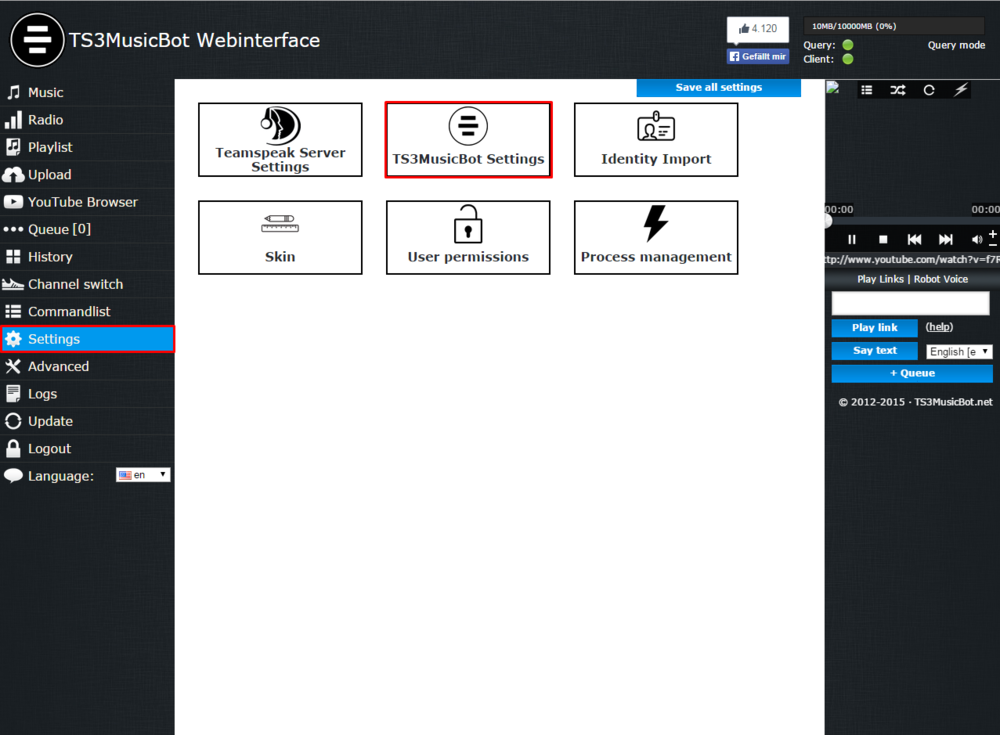
Pour contrôler le TS3MusicBot directement depuis Teamspeak, vous devez enregistrer l'Unique ID de vos administrateurs et de vos utilisateurs sur le panel de votre BOT. Votre Bot quant à lui doit être connecté à votre serveur en Query Mod. Pour connecter votre serveur en Query Mod suivez ce tutoriel. Pour enregistrer votre Unique ID, connectez-vous sur votre Teamspeak. Une fois connecté, cliquez sur l'onglet "Settings" puis sur "Identities". La fenêtre "Identities" s'ouvre. Dans cette fenêtre vous trouverez l'information "Unique ID". L'Unique ID est l’identifiant propre à chaque utilisateur de Teamspeak. Si vous souhaitez ajouter plusieurs personnes dans l'administration de votre BOT, vous devez récupérer l'Unique ID de chaque utilisateur. (Les autres utilisateurs doivent effectuer cette manipulation de leurs côtés et vous envoyez leurs Unique ID.) La fenêtre "Identities" s'ouvre. Dans cette fenêtre vous trouverez l'information "Unique ID". L'Unique ID est l’identifiant propre à chaque utilisateur de Teamspeak. Si vous souhaitez ajouter plusieurs personnes dans l'administration de votre BOT, vous devez récupérer l'Unique ID de chaque utilisateur. (Les autres utilisateurs doivent effectuer cette manipulation de leurs côtés et vous envoyez leurs Unique ID.) Copiez cet Unique ID. Rendez-vous maintenant sur le panel de votre TS3MusicBot. Pour se faire, connectez-vous à votre panel VeryGames. Cliquez ensuite sur "Panel TS3mBot" puis sur "Accès au panel". Une fois connecté à votre panel Ts3MusicBot, cliquez sur "Settings" dans la colonne de gauche. Cliquez ensuite sur le bouton "TS3MusicBot Settings". Dans le menu qui s'affiche maintenant, vous pouvez voir les champs "Admin identities" et User identities". Collez votre Unique ID dans le champs que vous désirez en fonction des droits que vous souhaitez attribuer à cette Unique ID. Retournez à la ligne pour chaque Unique ID ( un ID par ligne). Sauvegardez les paramètres via le bouton "Save all settings" et redémarrez ensuite votre BOT. Vous pouvez maintenant contrôler votre BOT. La liste des commandes utilisables sont disponibles dans votre panel du TS3Bot dans la section "Command list" sur le panel de BOT.
-
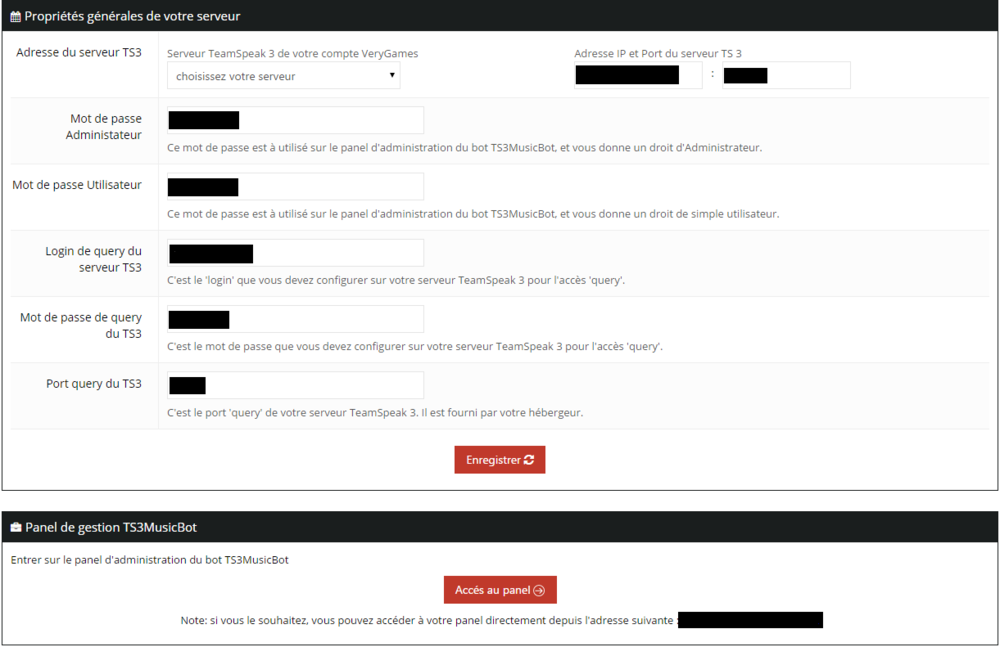
Pour utiliser votre TS3MusicBot sur votre Teamspeak, vous devez le configurer. Vous trouverez le panel de configuration du bot sur votre panel VeryGames, onglet « Général ». Dans ce panel, vous devez configurer : - Nom personnalisé : Personnalisez le nom de votre service sur votre panel VeryGames. -Adresse du serveur TS3 : Pour cette option vous pouvez choisir un serveur TS3 qui se trouve sur votre compte via le menu déroulant « Serveur Teamspeak 3 de votre compte VeryGames » ou configurer l’ip et le port d’un Teamspeak extérieur à VeryGames. -Mot de passe Administrateur : Mot de passe Administrateur pour le panel d’administration de TS3MusicBot. -Mot de passe Utilisateur : Mot de passe à configurer pour donner des droits d’utilisateurs sur le panel d’administration de TS3MusicBot. -Login de query du serveur TS3 : Login Server Query Admin. Pour configurer le login/mot de passe Server Query suivez ces instructions : Login et mot de passe Server Query -Mot de passe de query du TS3 : Mot de passe Server Query Admin. Pour configurer le login/mot de passe ServerQuery suivez ces instructions : Login et mot de passe Server Query -Port query du Ts3 : Si vous utilisez un Teamspeak sur v2.verygames.net, vous trouverez votre port query sur votre panel, onglet « Général ». Pour un Teamspeak extérieur, le port est fourni par votre hébergeur. Une fois ces informations enregistrées, le bouton « Accès au panel » apparaîtra dans le tableau « Panel de gestion TS3MusicBot ». Votre BOT se connectera automatiquement à votre Teamspeak une fois le service lancé. Cliquez maintenant sur « Accès au panel ». Vous trouverez sur ce panel toutes les options configurables de votre BOT. Note : Il est conseillé de configurer vos chans Teamspeak sur la meilleure qualité audio (Onglet audio dans les configurations de votre chan, puis mettre la barre « Quality » complètement à droite). Pour un détail complet des options et de leurs utilisations consultez la documentation officielle du BOT : http://wiki.ts3musicbot.net/index.php/Kategorie:TS3MusicBot_English








.thumb.png.63daa3daf4f938925764056f1118aa9b.png)

