-
Compteur de contenus
101 -
Inscription
-
Jours gagnés
3
Type de contenu
Profils
Forums
Calendrier
Articles
Tout ce qui a été posté par Charles
-
You can find all the admin commands here : https://pixark.gamepedia.com/Item_IDs
-
Voici un lien regroupant toutes les commandes disponibles sur PixARK : https://arkadmin.fr/les-commandes-de-spawn/ Deux onglets concernent PixARK.
-
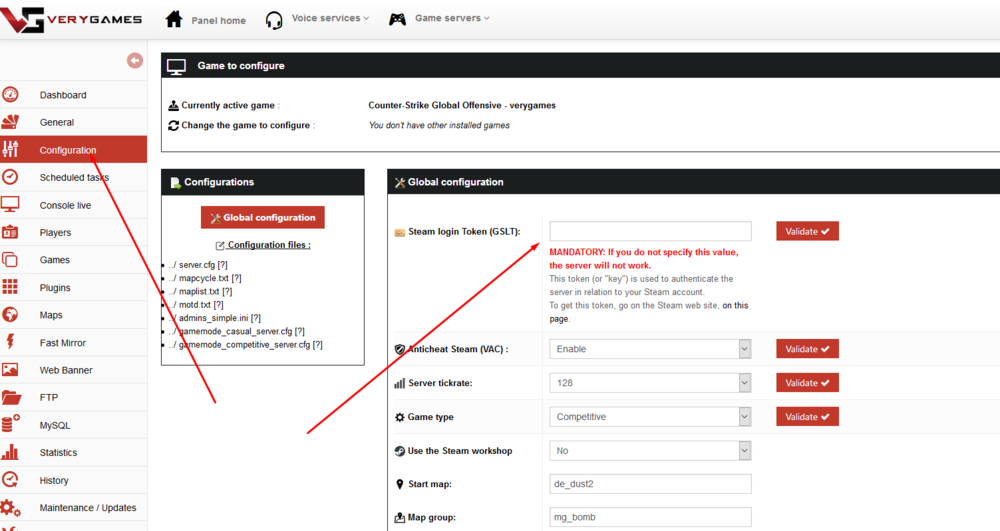
Il est maintenant obligatoire de renseigner un token GSLTs pour que votre serveur CS:GO démarre.Pour générer ce token rendez-vous : ici Pour l’insérer sur votre serveur, ajoutez-le simplement dans le champs "Token GSLT" de votre onglet "Configuration", puis redémarrer votre serveur. N'oubliez pas de sauvegarder et redémarrer votre serveur pour que les changements soient appliqués.
-
First of all you need to add to your server.cfg: tv_enable 1 tv_delay 30 tv_advertise_watchable 1 please tweak tv_delay to your desired value, we recommend a minimum value of your round times You can start recording demos by typing in the your client console, you can replace demoname with your desired name: rcon tv_record demoname to stop record type: rcon tv_stoprecord You can check which port gotv is running on by typing status in console e.g. hostname: Gameserver by pkrhosting.co.uk version : 1.33.4.0/13340 5687 secure udp/ip : 94.23.154.241:29060 os : Linux type : community dedicated map : de_dust2 gotv: port 27024, delay 105.0s players : 1 humans, 1 bots (11/11 max) (not hibernating) here you can see that gotv is running on port 27024 so to connect you would type in console connect 94.23.154.241:27024 A full list of GO TV commands which can be saved in your server.cfg are as follows: tv_enable <0|1> Activates SourceTV on local game server, SourceTV bot will appear as spectator client after next changelevel (master only). tv_name <name> Sets SourceTV name as it appears in server browser and scoreboard (master only). tv_title <text> Sets a SourceTV broadcast title shown in the spectator GUI tv_maxclients <0..255> Sets maximum client number for local SourceTV server/proxy (default 128). tv_stop Stops broadcasting the game via SourceTV. tv_status Shows SourceTV specific information. tv_clients Shows a list of all spectator clients connect to local SourceTV server tv_msg <text> Send a HUD message to all connected SourceTV spectator clients tv_retry Reconnects the SourceTV relay proxy to last known address (relay only). tv_autoretry <0|1> If enabled, SourceTV relay proxies try to reconnect to last known server after connection was lost. tv_timeout <seconds> Sets SourceTV relay proxy connection timeout in seconds. If a connection times out, the relay proxy tries to reconnect automatically. tv_delay <seconds> Source TV broadcast delay in seconds (master only). tv_delaymapchange <0|1> Delays the map change on game server until rest of buffered game has been broadcasted tv_port <port> Set the SourceTV host port (default 27020). Must be set as srcds start parameter. tv_maxrate <bytes> Sets the maximum bandwidth spend per client in bytes/second (default 5000) tv_snapshotrate <n> Sets world snapshots broadcasted per second by SourceTV (master only). tv_password <password> Sets required password for connecting spectators. tv_relaypassword <password> Sets required password for connecting relay proxies. tv_record <filename> Starts a SourceTV demo recording that records all entities & events (master only) tv_stoprecord Stops SourceTV demo recording (master only) tv_autorecord <0|1> Automatically records every game, demo file name format is auto-YYYYMMDD-hhmm-map.dem tv_debug <0|1> Shows additional debugging messages tv_dispatchmode <0|1|2> Sets Source client dispatch mode for connecting clients: 0=never, 1=if appropriate, 2=always tv_overrideroot <0|1> Overrides the master IP broadcast to spectators with a local IP. tv_relayvoice <0|1> If enabled, allow player voice chat if broadcasted (master only) tv_transmitall <0|1> By default entities and events outside of the auto-director view are removed from SourceTV broadcasts to save bandwidth. If tv_transmitall is enabled, the whole game is transmitted and spectators can switch their view to any player they want. This option increases bandwidth requirement per spectator client by factor 2 to 3. tv_chattimelimit <seconds> Limits spectators to chat only every n seconds tv_chatgroup <name> Allows spectators to choose their chat group. If no name if given the current chat group is shown (client only) tv_nochat <0|1> Disables other spectators chat lines (client only) tv_allow_static_shots <0|1> Allows auto-director to choose fixed camera shots (master only) tv_allow_camera_man <0|1> Allows spectator clients on game server to become SourceTV camera men (master only)tv_enable <0|1> Activates SourceTV on local game server, SourceTV bot will appear as spectator client after next changelevel (master only). tv_name <name> Sets SourceTV name as it appears in server browser and scoreboard (master only). tv_title <text> Sets a SourceTV broadcast title shown in the spectator GUI tv_maxclients <0..255> Sets maximum client number for local SourceTV server/proxy (default 128). tv_stop Stops broadcasting the game via SourceTV. tv_status Shows SourceTV specific information. tv_clients Shows a list of all spectator clients connect to local SourceTV server tv_msg <text> Send a HUD message to all connected SourceTV spectator clients tv_retry Reconnects the SourceTV relay proxy to last known address (relay only). tv_autoretry <0|1> If enabled, SourceTV relay proxies try to reconnect to last known server after connection was lost. tv_timeout <seconds> Sets SourceTV relay proxy connection timeout in seconds. If a connection times out, the relay proxy tries to reconnect automatically. tv_delay <seconds> Source TV broadcast delay in seconds (master only). tv_delaymapchange <0|1> Delays the map change on game server until rest of buffered game has been broadcasted tv_port <port> Set the SourceTV host port (default 27020). Must be set as srcds start parameter. tv_maxrate <bytes> Sets the maximum bandwidth spend per client in bytes/second (default 5000) tv_snapshotrate <n> Sets world snapshots broadcasted per second by SourceTV (master only). tv_password <password> Sets required password for connecting spectators. tv_relaypassword <password> Sets required password for connecting relay proxies. tv_record <filename> Starts a SourceTV demo recording that records all entities & events (master only) tv_stoprecord Stops SourceTV demo recording (master only) tv_autorecord <0|1> Automatically records every game, demo file name format is auto-YYYYMMDD-hhmm-map.dem tv_debug <0|1> Shows additional debugging messages tv_dispatchmode <0|1|2> Sets Source client dispatch mode for connecting clients: 0=never, 1=if appropriate, 2=always tv_overrideroot <0|1> Overrides the master IP broadcast to spectators with a local IP. tv_relayvoice <0|1> If enabled, allow player voice chat if broadcasted (master only) tv_transmitall <0|1> By default entities and events outside of the auto-director view are removed from SourceTV broadcasts to save bandwidth. If tv_transmitall is enabled, the whole game is transmitted and spectators can switch their view to any player they want. This option increases bandwidth requirement per spectator client by factor 2 to 3. tv_chattimelimit <seconds> Limits spectators to chat only every n seconds tv_chatgroup <name> Allows spectators to choose their chat group. If no name if given the current chat group is shown (client only) tv_nochat <0|1> Disables other spectators chat lines (client only) tv_allow_static_shots <0|1> Allows auto-director to choose fixed camera shots (master only) tv_allow_camera_man <0|1> Allows spectator clients on game server to become SourceTV camera men (master only)
-
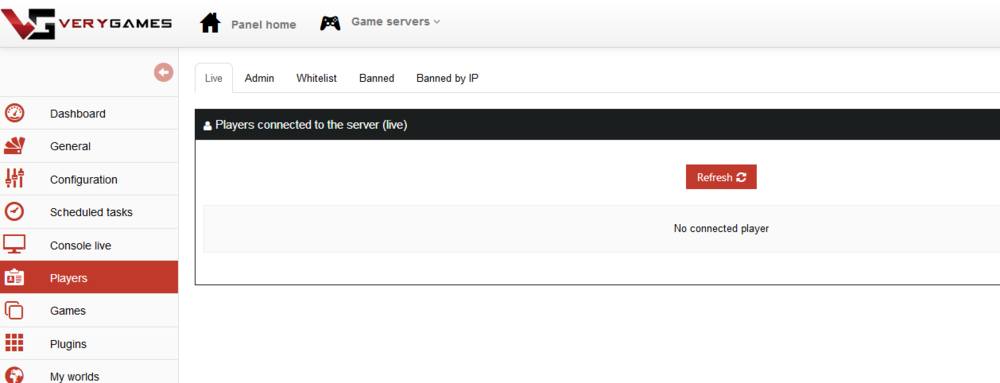
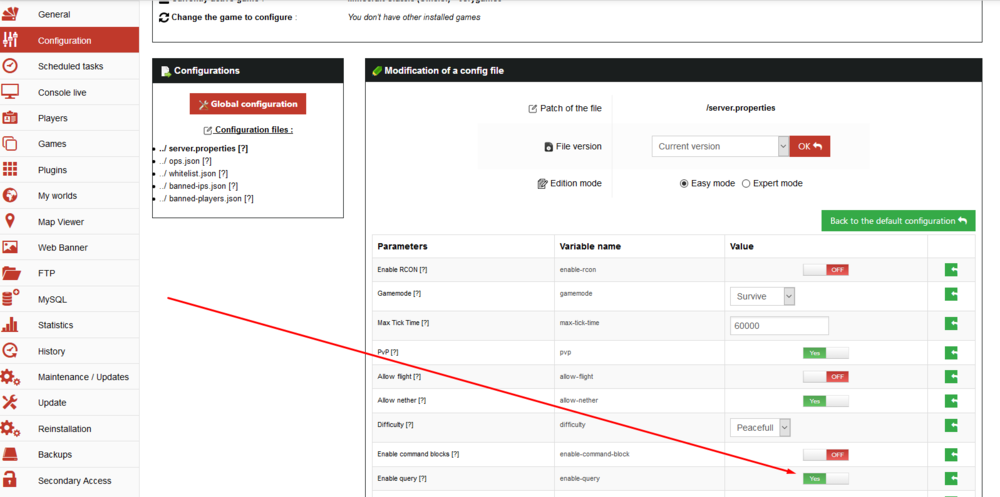
Go to the "Configuration" tab of your panel and then in the server.properties file. Activate the query to access the "player" tab of your panel and then go to the "Admin" tab.
-
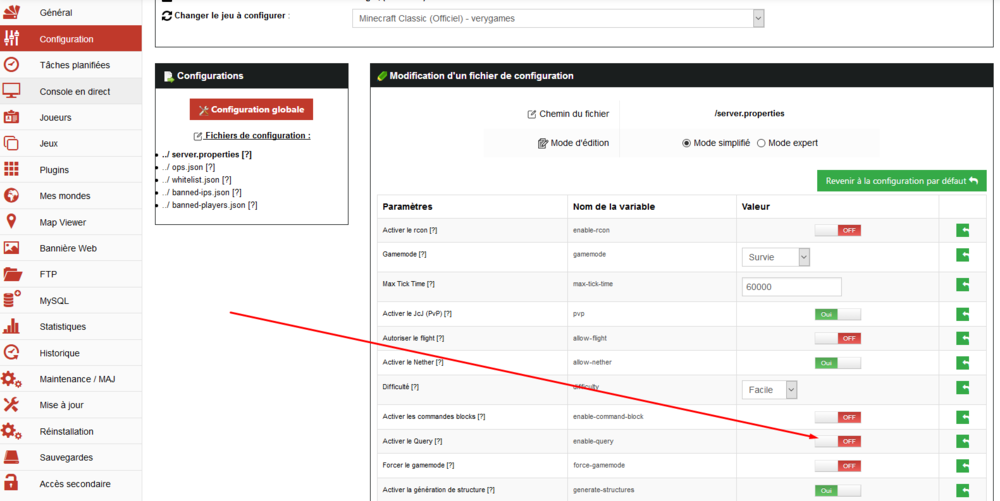
Rendez-vous dans l'onglet "Configuration" de votre panel puis dans le fichier server.properties Activer le query pour avoir accès à l'onglet "joueur" de votre panel et ensuite rendez-vous dans l'onglet "Admin".
-
To connect your bot to your discord server, first create an app through this link : https://discordapp.com/developers/applications/me Choose the name of your bot then create the app : [ATTACH=JSON]{"alt":"Cliquez sur l'image pour la voir en taille r\u00e9elle* Nom : \t\tScreenshot_1.png* Affichages :\t0* Taille :\t\t104,4 Ko* ID : \t\t\t538884","data-align":"none","data-attachmentid":"538884","data-size":"large"}[/ATTACH] The application is now created: [ATTACH=JSON]{"alt":"Cliquez sur l'image pour la voir en taille r\u00e9elle* Nom : \t\tScreenshot_3.png* Affichages :\t0* Taille :\t\t76,5 Ko* ID : \t\t\t538885","data-align":"none","data-attachmentid":"538885","data-size":"large"}[/ATTACH] Now add a bot via the "bot" tab: [ATTACH=JSON]{"alt":"Cliquez sur l'image pour la voir en taille r\u00e9elle* Nom : \t\tScreenshot_4.png* Affichages :\t0* Taille :\t\t113,5 Ko* ID : \t\t\t538886","data-align":"none","data-attachmentid":"538886","data-size":"large"}[/ATTACH] Copy the TOKEN : [ATTACH=JSON]{"alt":"Cliquez sur l'image pour la voir en taille r\u00e9elle* Nom : \t\tScreenshot_5.png* Affichages :\t0* Taille :\t\t69,2 Ko* ID : \t\t\t538887","data-align":"none","data-attachmentid":"538887","data-size":"large"}[/ATTACH] Place the available app ID in the "general information" tab and the bot token on your panel: Invite the app to your Discord server by copying this link to your browser (taking care to replace the client ID in the link with yours): https://discordapp.com/oauth2/authorize?&client_id=YOUR_CLIENT_ID_HERE&scope=bot&permissions=0 Once done, save the settings. The bot will then connect to your Discord server: [ATTACH=JSON]{"alt":"Cliquez sur l'image pour la voir en taille r\u00e9elle* Nom : \t\tScreenshot_7.png* Affichages :\t0* Taille :\t\t6,6 Ko* ID : \t\t\t538889","data-align":"none","data-attachmentid":"538889","data-size":"large"}[/ATTACH] Use your bot as with TS3, by connecting to the panel from the "Panel MusicBot" tab of your Verygames panel.
-
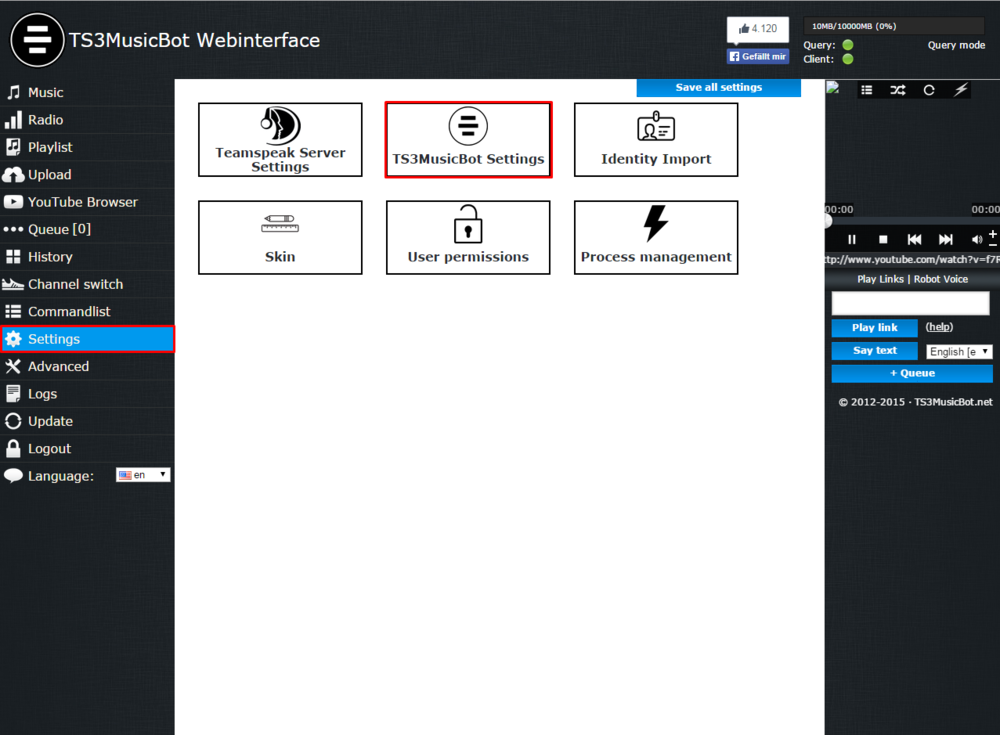
To control your TS3MusicBot directly from Teamspeak, you have to register your admins and users’ unique ID in your bot’s panel. Your Bot has to be connected on your server in Query Mode. One you are connected, click on the “settings” menu, and on “Identities”. The “identities” window opens. In this window, you’ll find the Unique ID information. The unique ID is a specific identifier for each user. If you wish to add several users in your bot’s admin, you have to get each user’s ID. Every user has to perform this manipulation and provide you’re their Unique ID. Copy this Unique ID. Go to your TS3MusicBot panel. To do so, connect to your VeryGames panel. Then click on TS3mBot panel and on “Panel access”. Once connected to your Ts3MusicBot panel, click on “settings” in the left column. Then click on the “TS3MusicBot settings” button. In the showed menu, you can see the fields “admin identities” and “User identities”. Paste your Unique ID in the desired field, according to rights you wish to attribute to this unique ID. Use on ID per line. Save your configuration with the “Save all settings” button and restart your Bot. You can now control your bot. The commands list is available in your TS3Bot panel, in the “Command list” section.
-
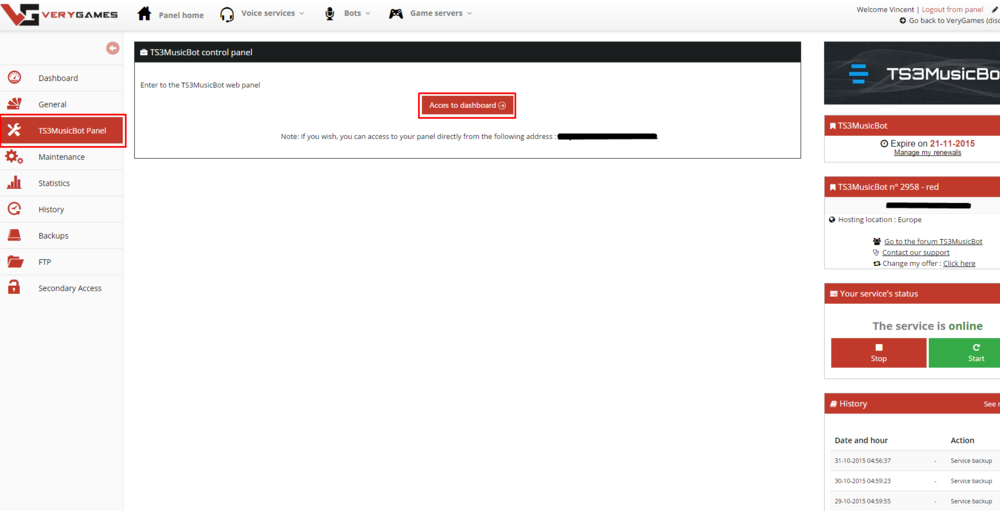
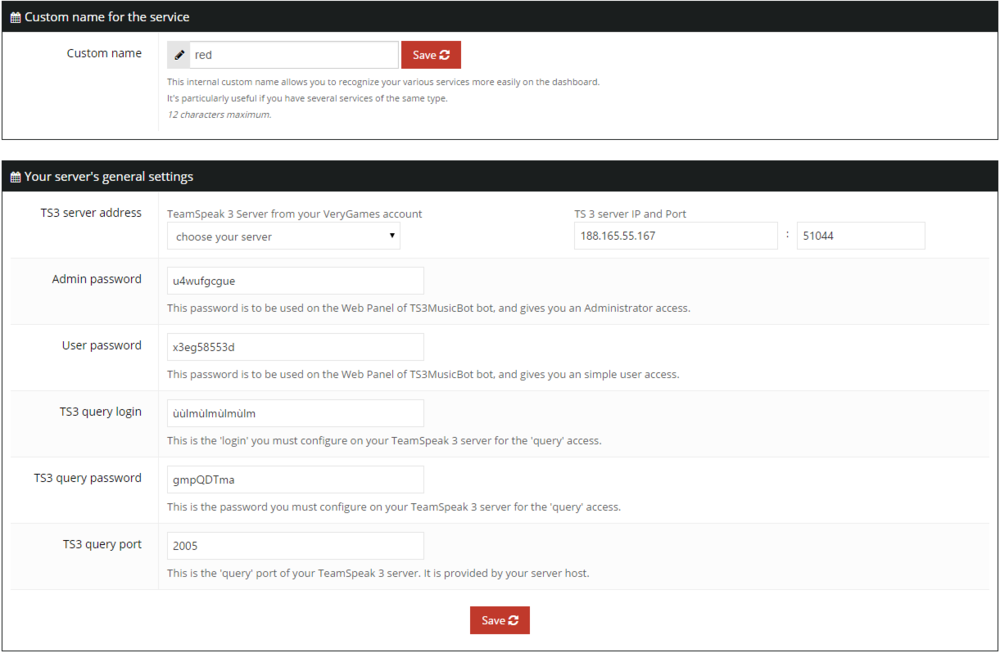
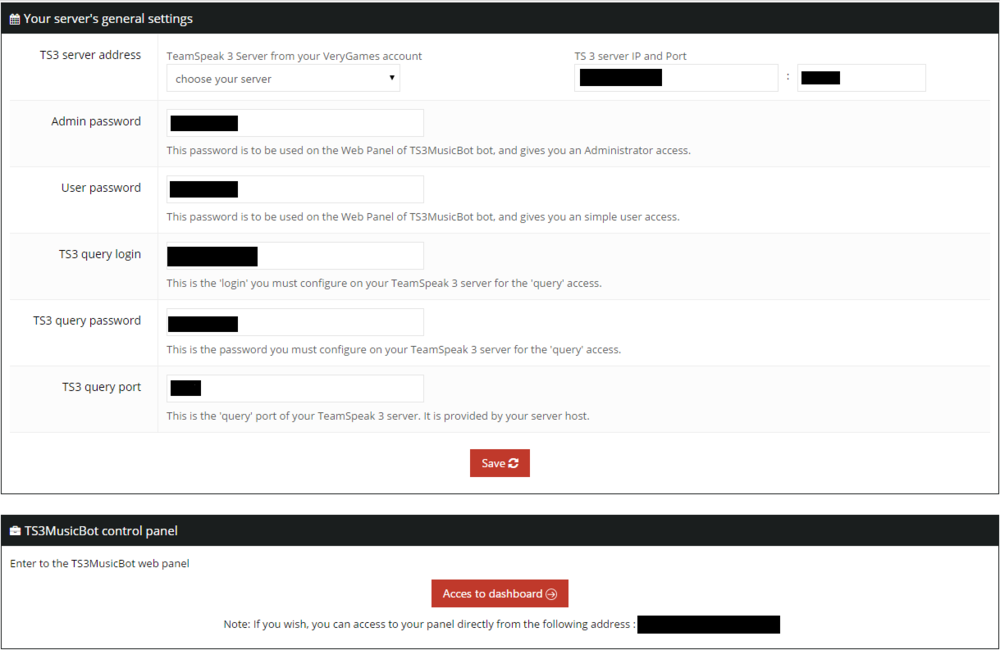
To use your TS3MusicBot on your Teamspeak, you need to set it up. You will find the bot’s configuration panel on your VeryGames panel, in the « General » tab. In this panel, you need to configure: “Custom name” (optionnal): Custom your service’s name on your VeryGames’panel. TS3 server address: For this option, you can choose a TS3 server that is on your VeryGames account (if any) with drop down menu « Teamspeak 3 Server from your VeryGames account » or configure an external Teamspeak server IP and Port. “Admin password”: Admin password for the TS3MusicBot’s admin panel. “User password”: User password to give users access to the TS3MusicBot’s admin panel. TS3 query login: To set the ServerQuery’s login/password up follow those instructions : ServerQuery's Login and password TS3 query password: To set the ServerQuery’s login/password up follow those instructions: ServerQuery's Login and password TS3 query port : If you are using a Teamspeak server on v2.verygames.net, you will find your query port on your panel, « General » tab. For another Teamspeak, the port is provided by your host. When you have saved all informations, the « Access to dashboard » bouton will appears on the « TS3MusicBot control panel » board. It is recommanded to configure your Teamspeak chan on the best audio quality. (Audio tab in the chan’s configurations, then put the Quality option on maximum). Now click on « Access to dashboard ». On this panel, you will find all your bot’s options and features.
-
To use your domain name with your service, you must point your domain to the IP address of your server. For this to work without specifying the port, you need create an SRV entry on your domain name. We have for teamspeak current address, ts11.verygames.net:1234 We want, ts3.rebels-corp.net The poiting of your domain at the IP will be made via a type CNAME, which is setting this way: The subdomaine: ts3 The destination: ts11.verygames.net For this to work without the port, you need create an SRV entry, which is setting this way: The service: _ts3 The protocol: UDP The subdomain: ts3 The priority: 3600 The port: 1234 The weight: 5 The target: ts3.rebels-corp.net The final result is: _ts3._udp.ts3. SRV 3600 5 1234 ts3.rebels-corp.net. We use Cloudflare, the manipulation remains the same with OVH, 1&1, ... Beware, DNS changes can take up to 48 hours to be effective.
-
By its nature, TeamSpeak 3, voice transmission in real time on the Internet, is a very sensitive service to network disruptions. What are the possible disturbances and their impact? The interferences can be linked in particular to: a technical problem with our network provider, in which case, we contact our providers immediately to inform them of the fault. a problem in an intermediate network operator: in this case, we inform our provider to ask if it is possible to bypass the problem. a problem with an unfiltered DDoS attack (not detected): in this case, we analyze the attack and enter with our provider to develop new measures against which allow to detect and block future similar attacks. Undetected attacks are rare (1-2 per month on average). a problem with a filtered DDoS attack (blocked): 95% of detected attacks do not disrupt the service. For the remaining 5%, the service is disrupted few seconds / minutes (less than 5 minutes). In all cases, either the service works intermittently (partial disconnections, voice like a "robot", cuts in the dialogue ...) or it does not work at all. What are the solutions provided by VeryGames? We have acquired over the years expertise in the anti-ddos protection and network quality. With this experience we choosed to use the first European operator network (OVH) and it's unmatched Anti-DDoS protection: filtering capacity of 480 Gbps, and a network of over 3 Tbps of overall capacity. We are in constant contact with their network engineers, and we actively participate in the improvement of anti-DDoS protection. We are aware of the importance for our customers to have a stable service, and we do everything to achieve it. Regarding the DDoS, dozens of attacks are received daily on our infrastructure, and 99% of them are detected / blocked completely, and are therefore transparent for our customers. The remaining 1% brings disturbances, and are as unpleasant as inevitable, given, again, the nature of the TS3 service. When this happens, two solutions: be patient until the perturbation ends, or have a secondary TS3 server (in another country or another operator).
-
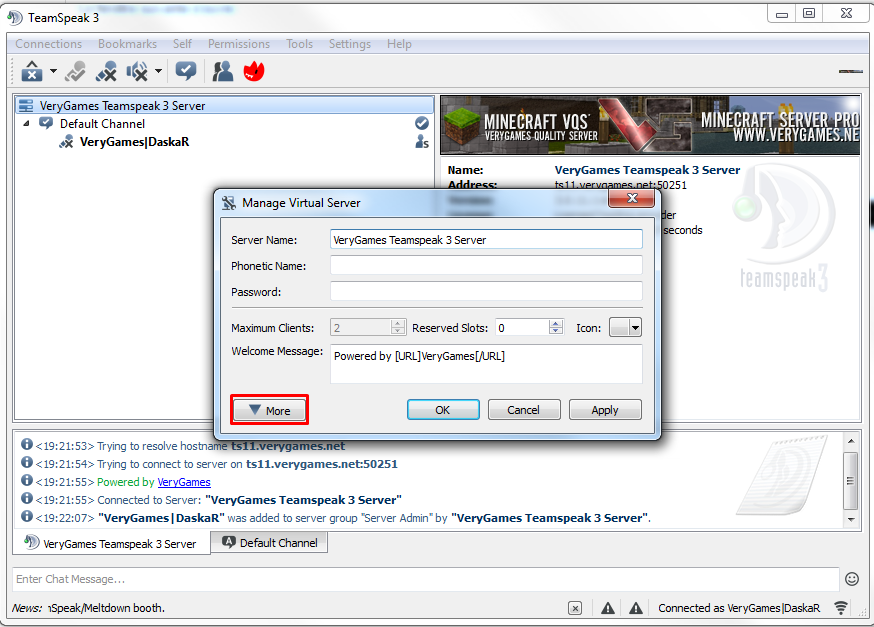
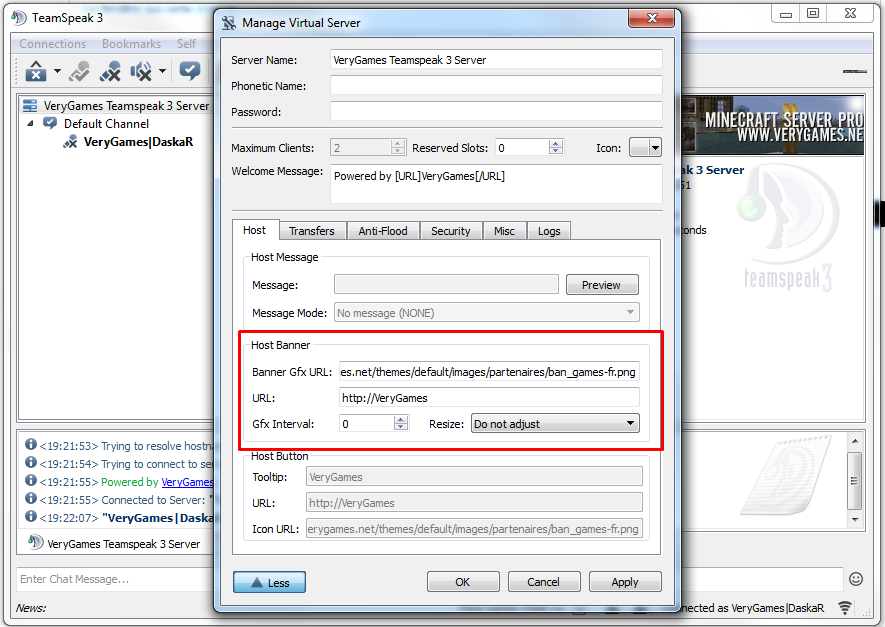
You can add a banner on your Teamspeak server. This banner will appear in the Information server’s part. Maximum height : 300px Maximum width : there is no maximum width but think to not put a too widest picture otherwise you will not see it entirely. Image type : You can use any image type, but prefer one that is not too big as the .png or .jpeg. You need to host your image or use a URL (for example, a google image). Connect to your Teamspeak. Warning : you need to be connected as admin on your server to proceed the following steps. Make a right click on your server’s name (root channel on the top of your channel’s list.) Select Edit Virtual Server Then click on “More” button on the left bottom. In the “Host” tab, you will find the line “URL” (At this line, you can set a redirection up on your picture.) and the line “Banner GFX URL” (At this line, put your URL’s picture, Google URL for example). Now you need to fill out those fields and click on “Apply” and “Ok”. Your image now appears on your Teamspeak.
-
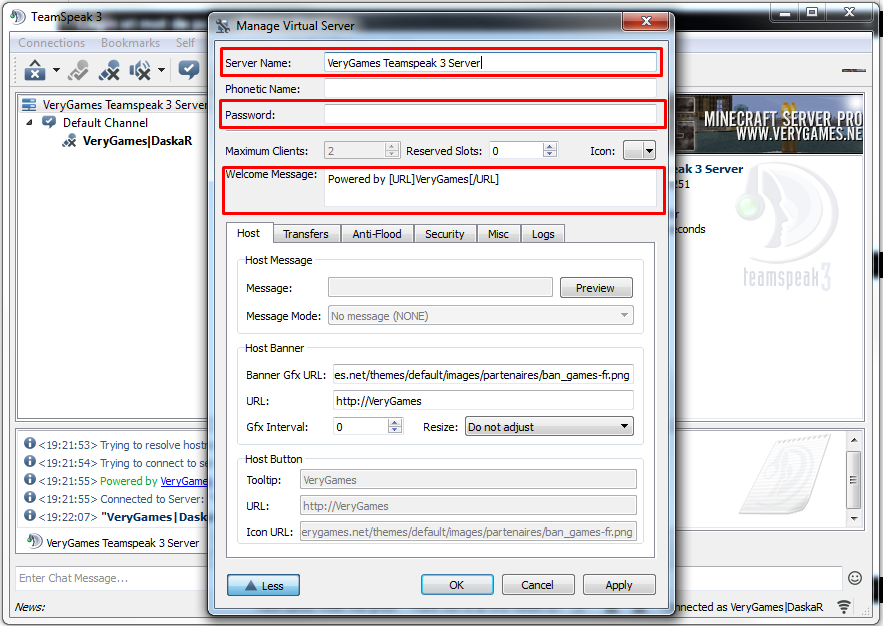
To change the Teamspeak server’s name/password/welcome’s message, you need to be connected in admin on your server. Click on the root channel (the first channel). Select Edit Virtual Server. The following window opens: Server name : put the server name that you want. Password : password required (for any user) to connect to the server. Welcome Message : Welcome message which will appear in the chat’s channel when you connect to the server. Click on "Apply" and "OK"
-
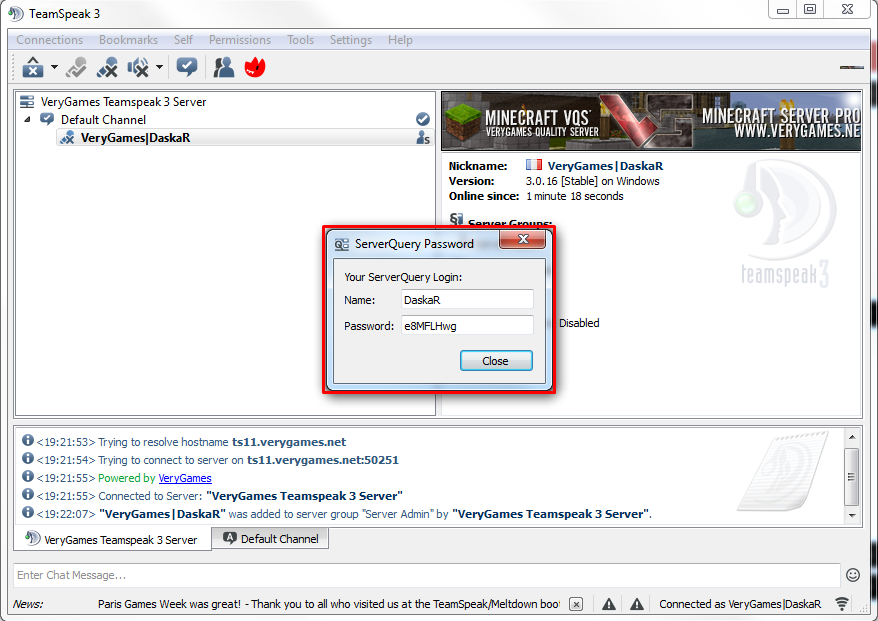
The Server Query’s login and password are used by plugins and connect bots on Teamspeak 3. To create a login and a password, follow those steps: 1. Connect to your server and make sure that you are admin. 2. Click on "Tools" 3. Then, click on "ServerQuery Login" 4. Enter the name that you want and click on "Ok" 5. The pop up will appear and will display your ServerQuery's name and password. Advise: Save the login and the password in a text file. You will find the Query’s port in the “My server” menu of the VeryGames panel.
-
To become a Teamspeak admin on your server, you need to use a privilege key. This key will be asked the first time you connect to your Teamspeak server. You will find this key in the “Privilege key” menu on your Teamspeak panel. Warning: A privilege key can be used only one time. You will be able to create other privilege keys, to become admin from another machine (another computer, a tablet or a smartphone) or further to a computer reset.
-
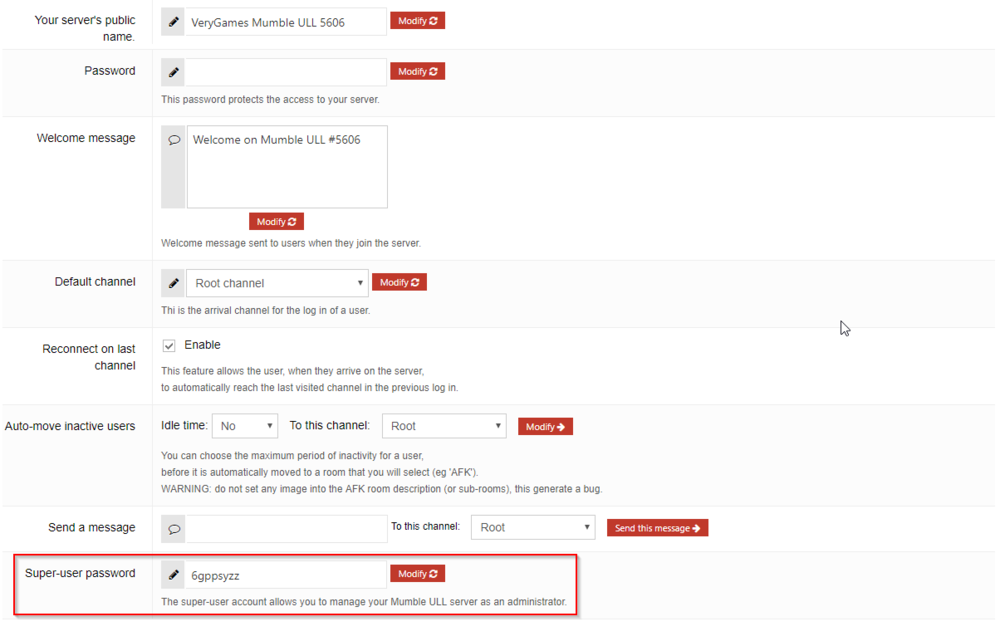
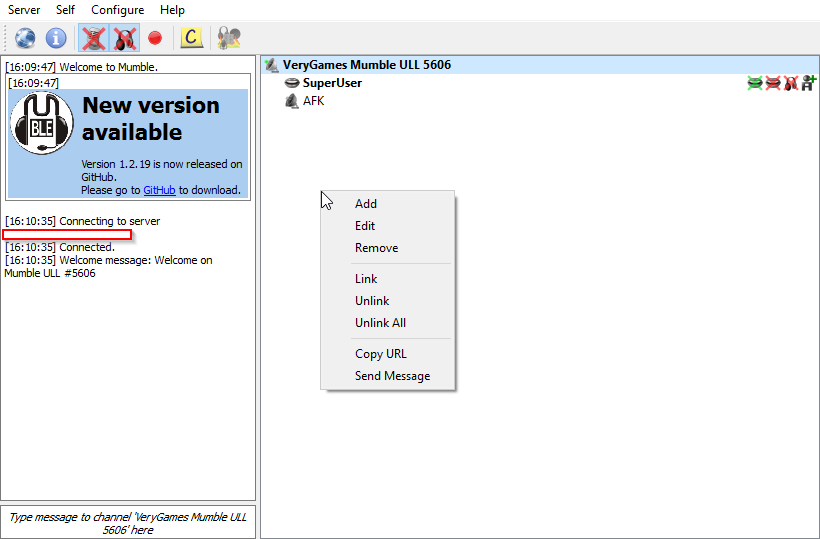
To admin your Mumble server, you have to connect to it as a SuperUser. To do so, go to your general tab to get and/or modify your SuperUser password. Once your password copied, edit the connection parameters, use the "SuperUser" name (with the upercases). A password field then appears. Click on OK, and connect. You're then SuperUser.
-
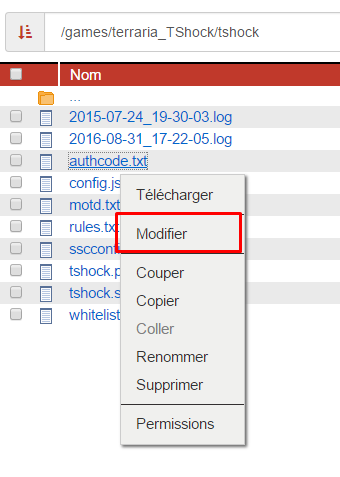
To be able to access an admin mode on your server, you first have to install the Tshock version, available by doing a new installation in your "Games" panel. Activate the game Once connected you need to obtain the admin token. This can be found via your ftp, in the authcode.txt file With the authentication token, in the client type /auth <token>. You should now be a server admin temporarily. The command should be executed without the brackets, like this: /auth 123456 Now you are a serveradmin, you need to create an account. Type /user add "username" "password" superadmin Again, the command should not have the brackets: /user add myusername mypass superadmin You can then login as the newly created user /login "username" "password" And, again, no brackets: /login myusername mypass Finally you need to type /auth-verify to complete the process. You should now be listed as a server admin! Each time you connect user the username you registered you will be prompted for a 'server password', this is the password you created.
-
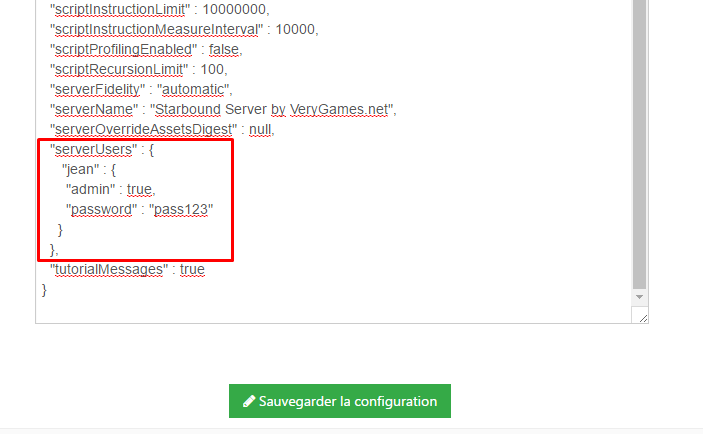
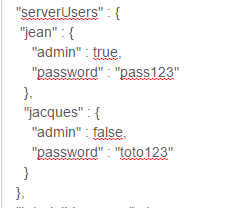
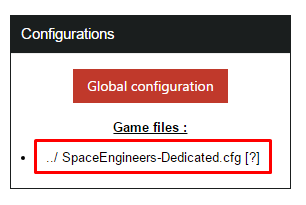
To add an admin (or several admins) on your Starbound server, go to the Configuration tab of your panel. You have to add users in the ServerUsers section of the file. If you wish to add a single user, use this format : "jean" : { "admin" : true, "password" : "pass123" } You will then get this : If you wish to add 2 or more users, Jean being admin, Jacques being a simple user : [b][i]"jean" : {[/i][/b] [b][i]"admin" : true,[/i][/b] [b][i]"password" : "pass123"[/i][/b] [b][i]},[/i][/b] [b][i]"jacques" : {[/i][/b] [b][i]"admin" : false,[/i][/b] [b][i]"password" : "toto123"[/i][/b] [b][i]}[/i][/b] Note the comma (very important !) after the first user configuration. Only the closing singleton ( } ) of the last user doesn't get a comma after it. You therefore have to get your configuration file like this : Save the file and restart your server. Connect to your server using the created logins. Note : adding non-admin users is useful when y ou wish to restrict your server's access with the "allowAnonymousConnections" : false configuration, which prevent anonymous players connection.
-
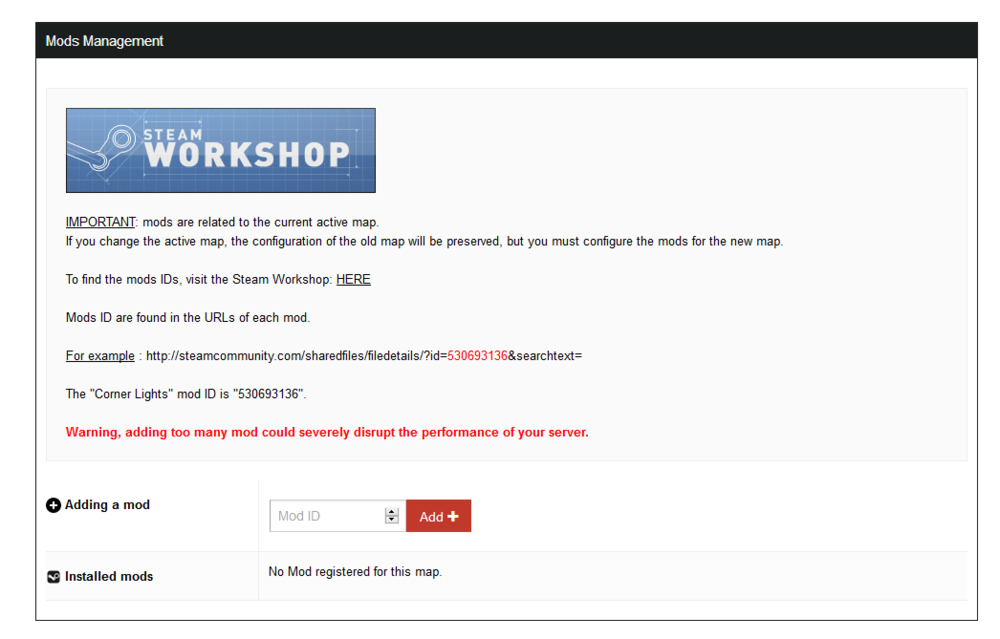
To install Space Engineers mods, you have to get the mods IDs that you wish ton install. You will find the mod's ID on its workshop page. You will find the number in the URL of each mod's page, for example : http://steamcommunity.com/sharedfiles/filedetails/?id=530693136&searchtext= The "Corner Lights" mod's number is then : 530693136 When you have this ID, go to your VeryGames panel, in the Configuration tab. You simply have to place the mods IDs in the field, click on "add" and save the configuration.
-
For now, the only feature that allows to make the server private is to restrict it to a Steam group. Therefore, you'll have to create a Steam group. Invite all the players you wish to grant access to. You'll then need the ID64 of your group. Go to your group's page For example : http://steamcommunity.com/groups/nameofthegroup/ Add "memberslistxml/?xml=1" at the end of your group's URL : http://steamcommunity.com/groups/nameofthegroup/memberslistxml/?xml=1 Copy the group's ID64 that is located into the "groupID64" tags : Once you have you ID64, go to the "Configuration" Tab of your VeryGames panel and click on the configuration file : All you have to do left is to place the ID64 into the "Group ID" field, and save your configuration file.
-
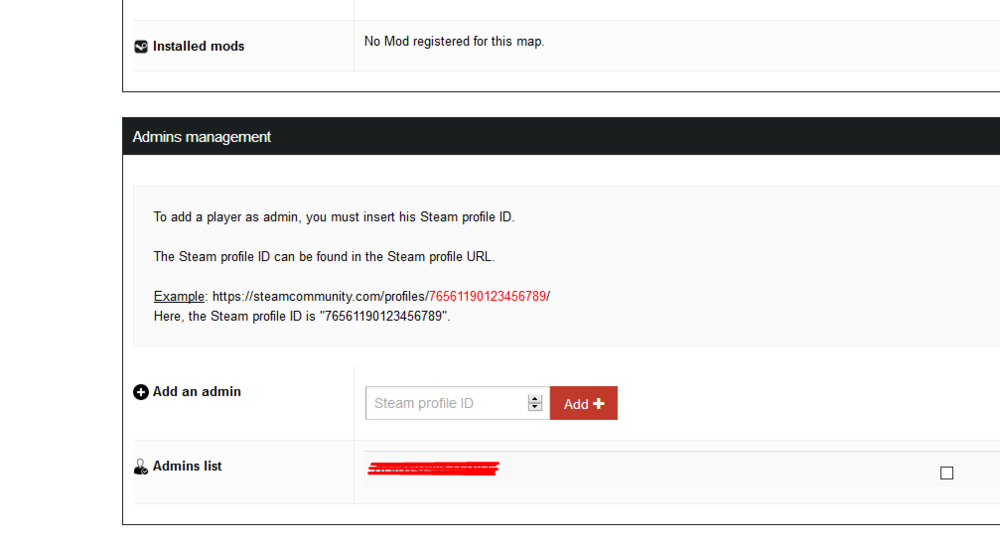
To set someone as admin, you will need his SteamID64: Go to your Steam profile and copy your profile's URL Go to the website http://steamidconverter.com/ and paster your URL. This website will convert your URL into various elements, including your SteamID64. Once you have obtained your SteamID64, go to the "Configuration" tab of your VeryGames panel. Select the configuration file, and add your SteamID64 in the "Administrators" field. Save your configuration file. Then, your server will be restarted.
-
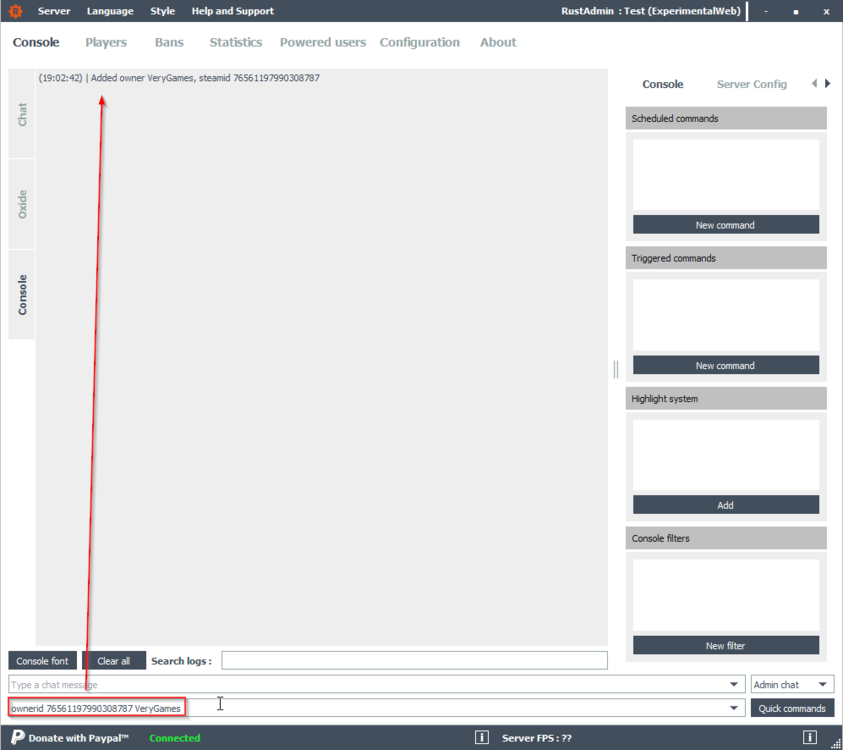
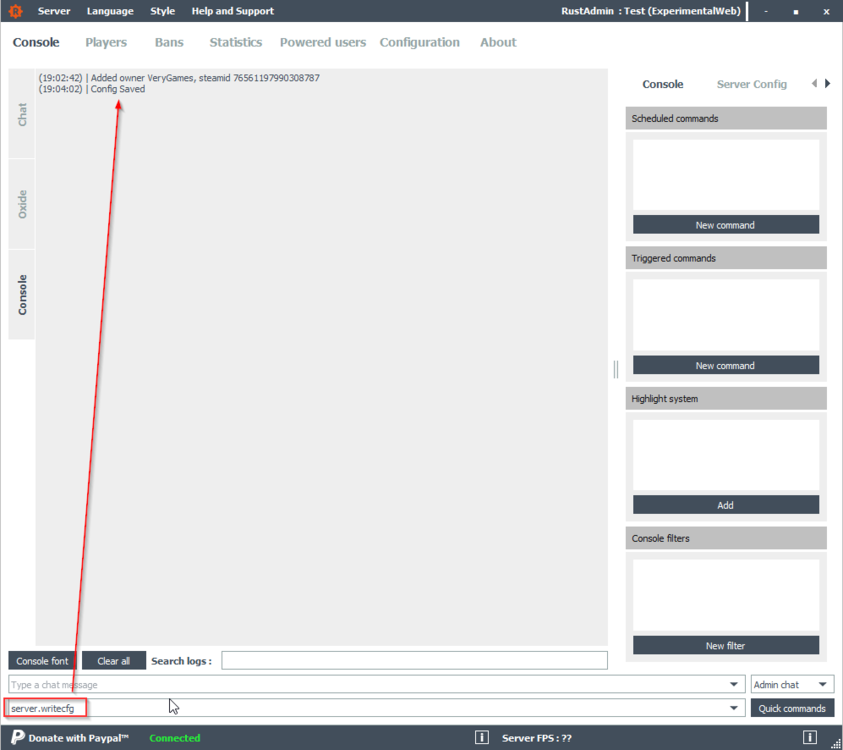
To use admin commands, you first have to get RustAdmin (or Rusty) and connect to your server. You will then have to go to the website https://steamid.io/lookup to look for you STEAMID64. To do so, enter your steam profile link and click on Lookup. To become admin in game, execute the following command on Rust Admin : ownerid "your STEAMID64" Pseudo Type the following command to save the modification : server.writecfg You should then be admin in game (blue nickname).
-
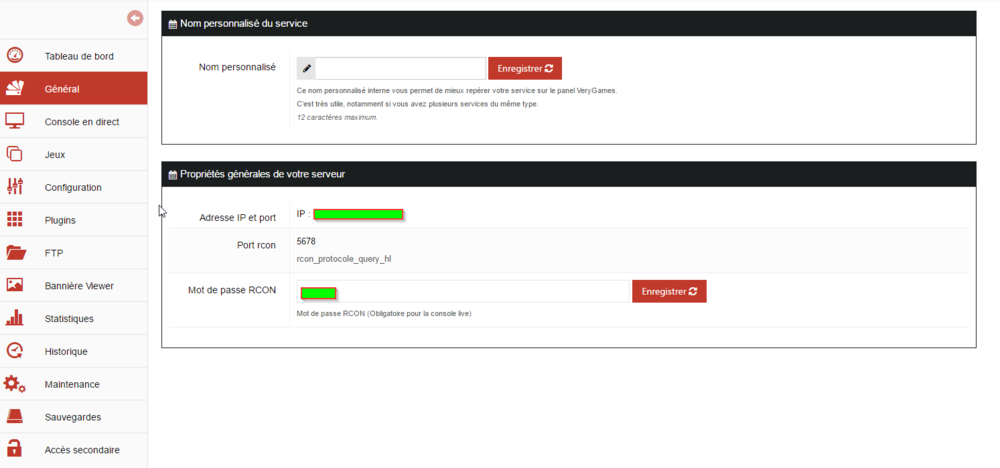
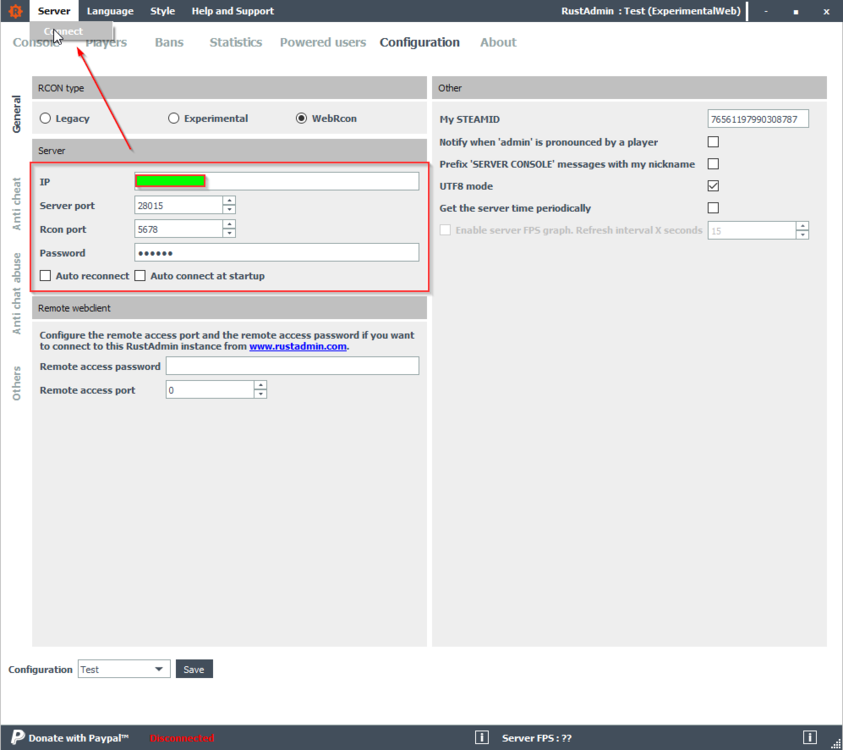
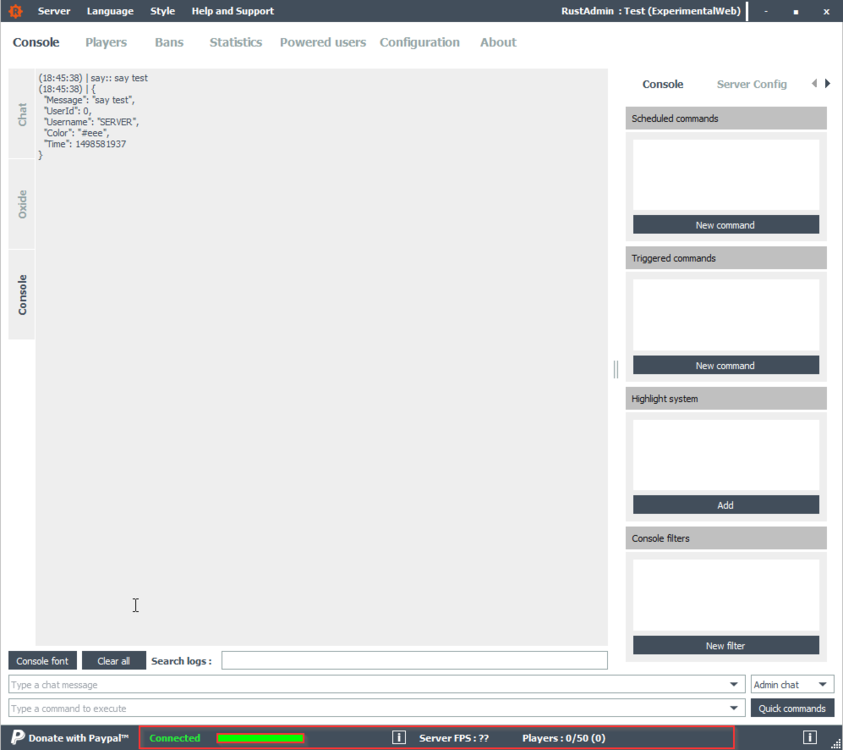
First, all the informations you need are located in your General tab. Copy these configurations on Rust Admin, and check WebRcon Click on : Server > Connect You should then be connected. You'll be able to send commands easily.


